CLICK HERE FOR FREE BLOGGER TEMPLATES, LINK BUTTONS AND MORE! »

Friday, August 12, 2011

A Little Tea Party Fun

It's another design team Friday for me at SVG Attic.  I enjoy my DT days!

My mother-in-law inspired today's project.  She is a pretty hardcore crafter so I know she can appreciate anything I make for her.  It's her birthday next week so I decided to make her a birthday card and feature it as today's design team project. She's the girly girl dainty type so I wracked my brain to come up with something that would fit her personality.  Something flowery and girly is what I needed.  I came up with a tri-fold shutter card with a tea party theme.

I am pretty tired of making basic cards so I have been experimenting lately with making different styles of cards.  I am having so much fun with it.  Today's project features a tri-fold shutter card.  This is the first time I've made this type of card.  I think it's my favorite type so far.  I'll bombard you with pictures before all the details!  Ready to Ooh and ahh?  Just kidding.


You like?  I really like it.  It's a fun card to make and there's so much you can do to design it.  I kept mine pretty simple.

The card measures 5 1/2' x 12"....that's the basics.  I forgot to measure all the rest of the card before I mailed it out!  So sorry!  I can make a tutorial of how to make a tri-fold shutter card if you would like.  Just let me know! 

All the SVG files I used are from SVG Attic.

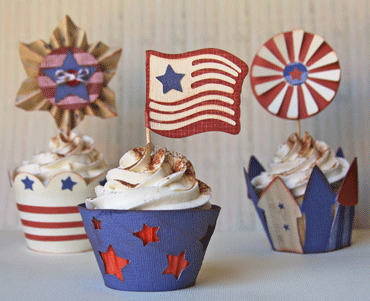
I used the Vintage Patriotic Cupcake Wrappers for the star fleurette on the front of the card and placed it atop two paper flowers with a paper flower sitting on top of it.  I finished that piece of with a button and twine from Trendy Twine.   

The tea pot, stack of teacups, and the cream colored tag in the middle are all from the Mad Hatter Tea Party collection.

The bows that are on the little panels are from the Classic Wedding collection. 

Oh and guess what I finally did?  I used my Sew Easy!  I have had it about a month now!  I am so bad at buying then not using what I buy for a long time.  I just did the basic straight stitch on this card.  I used the Rustic Stack from DCWV for the paper on the base of the card and open stock paper for all the decor inside.  Oh and the last little bit is the clock.  I wanted to use the clock from the Mad Hatter tea Party collection but I was worried it would be too small so I decided to stamp the clock from a stamp set I have and hand cut it out.  

Hope you enjoyed that card!  I am definitely going to be making more tri-fold shutter cards in the future.  They are fun to make and get!

Check back in a few days for a back to school project I will be working on!


Wednesday, August 10, 2011

Let me tell you about this site I know of....


How many of you checked SVG Attic yet?  If you haven't and you love using SVGs you really really need to head over there.  I fell in love with the collections the first time I saw them.  And no I am not saying this because I am on the design team.  The design team happened a bit after I started buying and using the files.  I applied for the team because I loved the files so much!  I saw the potential in the SVG collections for so many projects.  For me, that mainly means cards and such.

This week alone, SVG attic has released three new sets.  Yup, three!!  Jessica, the owner and designer, is amazing and you can tell that she loves making SVGs.  I wish I had some of that talent!  Here are the three new sets:


Aren't they awesome??  You can tell lots of thought and work went into these babies.  I am so proud to be apart of this up and coming company! 

Lastly, here's a picture of the SVG collections I used to make my latest design team project.  You get to see the project Friday!  Ha, sorry but just had to tease ya!


Hmmm, now what could I have possibly made with this hodge podge of collections that are all so different?  Come on back Friday to see!  In the meantime head over to SVG Attic browse around their shop, forum and blog for ideas.  Don't forget to check out the amazing design team while you're there!    Join in the fun with the current 3D challenge this month and enter to win some prizes. 

News just in!  Two more sets are being released tomorrow!  I can't wait to see them. 

Use coupon code B2S through August 13th to save 30% off your purchase. 


Sunday, August 7, 2011

Back From Vacation!

Hi everyone.  I have been MIA for a week.  I completely forgot to mention that I wouldn't be posting any new entries for a little while.  If you are a Facebook fan of mine then you got the message.  So, I was gone on vacation.  I purposely left my laptop behind and turned off my phone for the entire week.  I didn't think I would be able to handle it but you know what?  It was so refreshing being away from all the electronics that take up most of my day.  I did a lot of reading, relaxing, and hanging out with my family and friends.  It was a great time.

Now that I'm back it's life as usual...projects, work, etc.  Speaking of projects, I made my SVG Attic design team project today.  Here's a sneak peek:


Any guesses as to what it can be?  J/K.  There's not enough there to make a good guess.  Look at the bottom though.  I finally used my Sew Easy!!  Yay me!  I also finally set up my Roku so I can stream Netflix and Pandora in my craft room.  I have had it for a few months now.  I am one of those people that gets something and lets it sit for awhile before using it.  I'm weird.  Well, now that my TV is all set up all I need in my craft room is a fridge!!

Look for a new project this week.  I made a promise to a super sweet person that I would send them something and I will be working on that this week.

Thursday, July 28, 2011

My Thoughts Exactly Guest Designer Day: Triple Scoop Waterfall Card

The day you have all been waiting for has finally arrived!  Oh OK, it's the day I have been waiting for but it was nice to dream that you all were waiting in anticipation too.  Today I get to show you a project I made for my guest designer spot for My Thoughts Exactly stamp company.  Have you seen their stamps yet?  LOVE!!  You can mix and match the words to make your own phrases.  They are so versatile!  You can evenb use each word individually as I did in my project for today.  You get to see some pictures today and a video!  Yes, I made a short video to show you what the heck my project does because poor little me had no clue going into it!

Lately I have been trying new techniques or types of projects.  I started with the step cards and made a few different styles of them.  The I tried my hand at bookmarks and made a few of those and I made a shape card on Tuesday, the first of it's kind for me.  There's probably more in there but I can't think of what else I've done.  I seriously am always trying something new...always....whether it be a new technique, a new toy, or a new style.  I am in love with learning.  On that note let's get on to my *sweet* project.

As I mentioned earlier, I am always up for trying something new.  This project is no different in that it's something I have never made before.  Awhile back waterfall cards were the rage but as is usual with me I am really slow with getting into what the cool trend is.  I am like that with everything actually.  So I had seen these waterfall cards around and never really cared to make them.  I thought you make a card, attach some flaps to it and there ya go.  You just flip the flaps up and that's it.  Well, I was wrong.  Wait...did I just say that?  Don't tell my husband!  He will use it against me for life!  I found a video tutorial and that is when I found out what a waterfall card REALLY is...an awesome interactive card!

Before I knew what a waterfall card was I already knew I wanted to use the super cool triple scoop ice cream cone from SVG Attic's Ethan's Cool Treats SVG Collection and My Thoughts Exaclty's so to find out that parts of the card can move made me even more excited!  I didn't even know if I could pull it off but guess what?  I did!  Woohoo to me! 

Triple Scoop Waterfall Card


You know you want some!!


YUM!

Now to show you what it does.  It looks like just flaps you flip up right?  The card in action is so much cooler!  Here's the video.  By the way it's my first video ever and I enjoyed making it and editing it. 


Get the link HERE in case you can't view it on the blog.   

I really hope you enjoyed my guest designer project!  If you have any questions you can email me at 19eightyexpressions@gmail.com!  

Don't forget to check out SVG Attic and My Thoughts Exactly.  The two companies are working together to bring you coordinating SVG and stamp collections!  How awesome is it that I am on the design team for SVG Attic and get to be a guest designer for My Thoughts Exactly?  I had the guest designer spot before I made it onto the SVG Attic design team and had no clue the two were collaborating.  What an exciting day for me to find out I get to work with both!!

Psst, Monday My Thoughts Exactly is debuting two new stamp sets.  You don't want to miss it!  Sadly I will and it can't be helped.  I really am bummed. 

Tuesday, July 26, 2011

A Sweet Treat

Hi everyone!  I feel like I've been neglecting you all and just making cards or other projects for design team project days or guest designer spots.  I decided on a whim to make a really quick and simple card using SVG Attic's Ethan's Cool Treats Collection.  This isn't for my design team spot or anything, just felt like making something that wasn't complicated!  Plus, it's HOT and I have been craving ice cream lately.
 

Popsicle shape card


First off, I didn't notice the white part of the pink popsicle wasn't glued down all the way until the picture were already taken.  Don't judge me for that!!  Hehe.

I made this card to fit into an A2 size envelope.  I made a shadow layer of two of the popsicles together and welded it in MTC to make the base of the card.  If you notice I welded it on the wrong side...uh, I meant to do that *wink*wink*.  I glued the paterned paper and the orange popsicle to the base and used pop up squares to attach the pink popsicle.  If you notice with all my cards I have to have some dimension.  I don't like flat cards or layouts.  I used kraft paper for the popsicle sticks and inked the edges of the pink and orange popsicles. 

With this new MTC (3.3.2?) I was able to cut more accurately on my Silhouette mat because now there's a Sil mat on there!  Woohoo!  No more wasting paper.  It wasn't much waste but I like to know exactly where it's going to start cutting. 

Look for my guest designer spot this Thursday.  I made something super duper sweet for that project! 

Friday, July 22, 2011

New Toy Part 1: Distrezz-it-All

I have had my eye on two tools for quite some time now.  The lovely *pink* tools are the Sew Easy and Distrezz-it-All.  I have seen them around online and at independent scrapbook stores but I have always held off for some reason until today!  I made the leap and bought both!

So far I have only used one of them, the Distrezz-it-All and let me tell you....wow!!  I have been distressing the edges of my paper by hand with Tim Holtz' distressing tool.  It works OK but I end up bending my paper and it takes a lot of time.  The Distrezz-it-All takes all those problems away.  So far I have only used it once but I love it already.  Here's a simple card I made using it.


I distressed the edges of the cardstock that the flower is on and inked the edges to give it a vintage look.  Easy easy!  I ran the paper through the machine and it was all distressed-like in no time!  If you like the distressed or vintage look the Distrezz-it-All is a must have!

New Take on a Simple Project

Well well, the day is finally here.  It's my SVG Attic design team project day!  Woohoo!!  I look forward to these days.  As I mentioned in my Christmas in July post earlier this week I am obsessed with bookmarks all of a sudden.  That project was a bookmark and guess what today's project is. 

Any guesses? 

You guessed correctly!  It's a bookmark! 

Before you think to yourself, "Not another one, you just made one" let me explain.  These (yes, plural) are not the normal everyday bookmarks you see.  They are different than the one I made earlier this week.  Anyway, I have issues with making the same thing twice.  I get bored very easily so I am always on the hunt for new ideas, new techniques, new anything so these are different.  They serve the same purpose but have a different design.  What?  You want me to shush already and see some pictures?  OK, here ya go!


Set of four bookmarks


Pillow box

There's something a little different about these bookmarks
Tweet Tweet

Who Who


 They look like ordinary bookmarks don't they?  So can you figure out what's different about these?  Betcha can't......not yet at least.  Here's some *action* shots!


Corner bookmarks

The paper slips through an opening on the right.


Slip the book page right in there


How cool is that?  They are so easy to make too!  Here's a picture of the first one I made.  A very simple one for my daughter which really only took a few minutes to whip together.  


I used a piece of cardstock, a piece of patterened paper, and some eyelets.  Telling ya, super easy!

On to the nitty gritty of how I made these little guys!

As mentioned above, I used a piece of cardstock and a piece of patterened paper as the base for each bookmark.  From there I used my little creative brain to make each one different.  Each bookmark is 2" in width and 3.25" in height when folded and 4" x 6.5" unfolded.  The cardstock is folded in half like a card but you open it on the opposite side.  You can make the bookmark open up the other way as well.  The left side and top of each is secured so that only a small slit is created into which you can slide the book page into.  I decided to secure each differently so you can get some ideas.  I'll detail each one individually.
 

1. Tweet Tweet


I used the Birds and Bees Collection from SVG Attic which you can get HERE.  I sized the birdies down in MTC to fit the bookmark and they are about 1.5" by 1" each.  The sentiment stamp comes from the coordinating stamp set from My Thoughts Exactly called Birds and the Bees which you can get HERE.  The patterned paper is ColorBok which I bought from the Target dollar bin.  In fact all the paper is from the same pack.  Oh, and guess what I found out!  ColorBok has a warehouse not too far from me where they have clearance sales from time to time!  Yay me!  The twine I used to secure the left side is called Krazy for Kraft from Trendy Twine which you can purchase HERE.  I punched holes in the side and threaded the twine through.  The looped ribbon at the top is looped and is from American Crafts.


2. Pretty Tree


The tree is from Give a Hoot SVG Collection from SVG Attic and is sized to just under 1.75" x 3".  The sentiment stamp is from the My Thoughts Exactly Birds and the Bees stamp set.  I secured the left side of the bookmark with eyelets that I set using a Crop-a-Dile.  I criss-crossed some brown bakers twine from Trendy Twine around the trunk of the tree.


3.  Hoot Hoot


The owl is from SVG Attic's Give a Hoot Collection.  I welded him to the top of the bookmark in MTC.  To make sure he's stable it's best to weld him at equal intervals on the full length of the bookmark (unfolded) in MTC and then fold together when cut.  If you don't you have a poor owl that is falling off his perch!  He's 1.25" x 1/5".  The sentiment stamp comes from My Thoughts Exactly Birds and the Bees stamp set.  I sewed the left edge and top together using a sewing machine. 


4.  Birdie House 


The birdhouse comes from the Birds and Bees Collection at SVG Attic and is 1.5" x 2".  I looped the brown twine around where the bird house entrance holes are and looped some of the lighter brown twine at the top.  The twine is from Trendy Twine. Hmm, are you seeing a *trend* with the twine?  Yes, I LOVE their twine!  To secure the side and top I glued the bookmark edges.

That about does it...sort of.  Just one more element to talk about.  The pillow box!


To fit the bookmarks in the pillow box I had to size the box in Silhouette Studio to just about 7.5" x 7.5".  I folded up the pillow box along the scored lines and went on my merry way decorating it.  I used the flower from the Mad Tea Party Kit SVG Collection from SVG Attic.  I centered it on three different paper flowers and topped it off with a blue jewel brad.  I used a strip of cardstock and a strip of patterned paper around the pillow box and wrapped some green twine from Trendy Twine around it as the finishing touch.

OK, really that is it!  Whew, that was long!  Now to figure out who to give this to!