CLICK HERE FOR FREE BLOGGER TEMPLATES, LINK BUTTONS AND MORE! »

Sunday, November 27, 2011

Christmas Is Upon Us

This past holiday weekend I got a little taste of Christmas.  My mother-in-law came down from Utah and brought us all gifts.  I had to think quickly as to what  should give her.  I am one of those last minute people so that morning I set to work thinking.  It was either get her some type of scrapbooking item (she's a crafter as well) or make her something I love giving her handmade gifts because she really has a deep appreciation for them.  

I chose the harder route and made her something.


I ALMOST didn't give this to her.  I wanted to keep it so bad!  It tuned out so pretty.  The pictures don't do it justice at all.  When she saw her gift the my sister-in-laws ooh'd and aww'd over it too and said they were putting in an order for one too.  Funny ladies. 

I purchased the frame at the Salvation Army for under $2.  It actually is supposed to have two more picture slots where the tree and tag is but I decided not to cut those out because it looked too over crowded with three pictures in one frame.

I used DCWV's Mrs. Claus' Kitchen Stack for the background paper and the tag and Mod Podge to seal the paper onto the frame.  I threw in some buttons, ribbons, bling, and Trendy Twine's Peppermint Stick twine.  I also used one of my favorite tools, Epiphany Crafts Shape Studio for the yellow epoxy star and the round green embellishments on the tag. 

BTW, the links above, except the one for Trendy Twine, lead you to Joann's website because each item I linked is on sale with free shipping.  Take advantage of the sale while you can!

Trendy Twine is having a sale as well.  Use coupon code "AFTERTHANKSGIVING" to receive 15% off any $25 twine purchase now through Monday.

Now onto my next item.  I received a laminator from my mother-in-law...what can  use it for?  I can laminate bookmarks...that's all the ideas I have.

~Kasi


Thursday, November 24, 2011

Snowman Frame


I hope you all had a great Thanksgiving (for those of you who celebrated).  My day was full of family, food, and fun.  I tried my hand at some 10pm Black "Friday" shopping (on a Thursday!) and turned my happy butt right back around and drove home when I saw the people lose their minds in Walmart over some video games.  It was nuts.  I used to be a seasoned Black Friday shopper but I just can't handle it anymore.  Anyway, for those of you who braved the madness, I hope you got what you wanted!

Today is my SVG Attic design team project day.  Yippee.  I made a bit of home decor since I have absolutely none for Christmas.  Sure I have a tree and ornaments but...well...that's about it.  I decided it was time to make something festive to display in my barren house.  


I got the very pretty white frame from the dollar store (score!) for a whopping $1 (duh).  Not too shabby eh?  It's about 7"x7" in length and width.  

The background paper came from DCWV's Christmas & Winter Stack. 

The snowman is from SVG Attic's Build a Snowman collection.  Isn't he adorable  I stamped Mr. Snowman's eyes on using Peachy Keen's Simple Sallies ou Face Assortment

I had cut the "BELIEVE" that's at the top of the frame for another project I did this past weekend and I saved all the cutout letters.  Good thing I did because it goes perfectly with this framed snowman.  

The snowflakes are confetti-like pieces I've had since last Christmas.  I knew those babies would come n handy again one day!

I hope you enjoyed this project.  Look for my next project very very soon!  I made a gift for my mother-in-law which I think you'll love.  I seriously did NOT want to give it away.  

Also, remember to enter for your chance to win a free My Memories Scrapbooking Software Suite!  Click HERE for details.   

Enjoy the rest of your weekend!

~Kasi

Sunday, November 20, 2011

My Memories Digital Scrapbooking Software GIVEAWAY & REVIEW


Recently I was given the opportunity to try out My Memories digital scrapbooking software.  I jumped at the opportunity since I like trying new things and what better time to try it than when I am very much into making layouts again.  It really was perfect timing. 

I tried out the software using different methods, meaning when I made layouts I used not only what the software came with but I also used files I purchased from My Memories and also digi files I already had on my computer.  Yup, you can use files you already own!  Details will be given after each picture posted.

Using digi files that came free with software


The first layout I made was using the files that came with the My Memories software.  Each element and embellishment, with the exception of the pictures, was pre-loaded onto the My Memories software.

Using digi files I already owned

 
The background papers are from Jessica Sprague and all the embellishments came from Lettering Delights.  I made this layout so you can see how you can mix and match digi files you own and also use the My Memories digi files as well.  You're not limited to only using My Memories' digi files.  

Using a pre-made layout

Don't feel like taking a ton of time to make a layout?  No fear, My Memories is here!  I used a pre-made layout that My Memories has in it's digi store called Aloha Quick Pages.  All I did for this layout was add the pictures and the title and I was DONE!  So super easy.  This particular pack came with four pre-made layouts in total and you can get them in both a 12"x12" format or 8.5"x11".  Pretty cool for those lazy days.  

Using digi files from My Memories online store


I made this last layout using the I Am Thankful digi pack I purchased from My Memories.  There were a ton more embellishments that came with this pack but I didn't want to crowd the layout too much.  

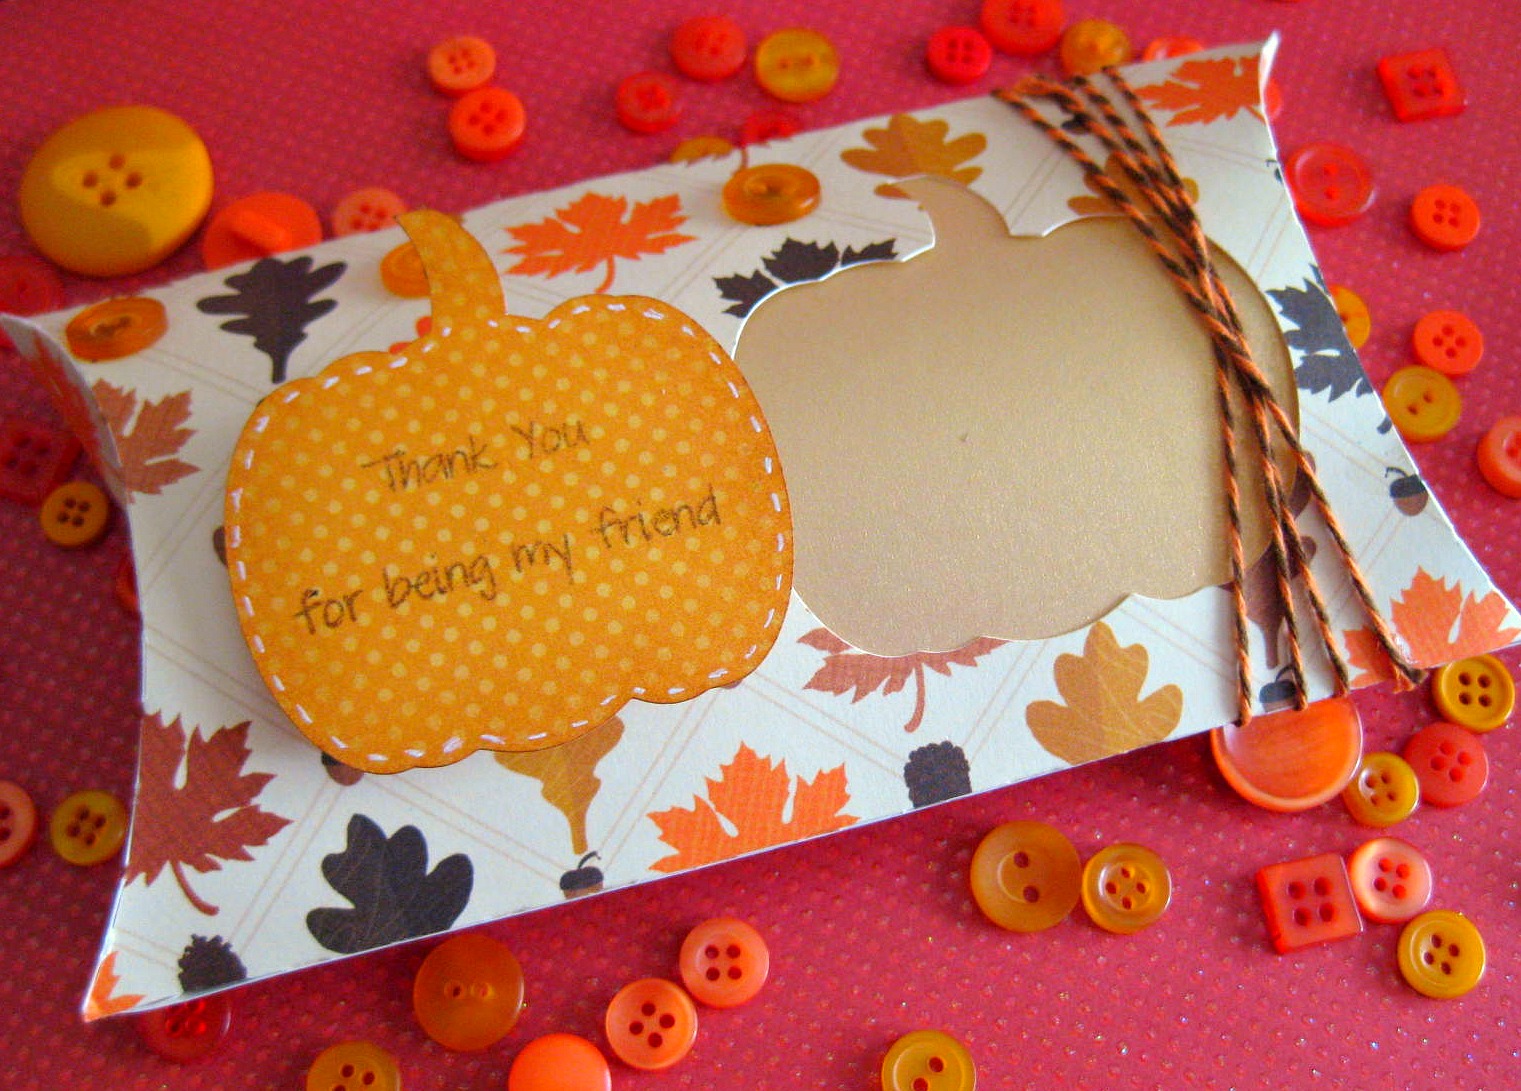
Using My Memories to make a card


Yup, a card!  I used the I Am Thankful digi pack and the print and cut feature on my Silhouette to create this holiday card.  You're not limited to just making layouts, as you can see here.  You can even make a physical layout using print and cut and the My Memories digi packs, tags, etc.  


With this software you can make whole albums using premade layout templates where you just add the background and embellishments to each page.  The picture below shows the album I was creating and the layout of each page.  You can change it up if you want.  Drag and drop your pictures and start embellishing!


Here's an example of a premade template up close.  I used a template similar to this to make my Thanksgiving layout. 


REVIEW 

I enjoyed trying a new way to scrapbook.  I am a traditional scrapbooker and have never scrapbooked using digital software before.  When I went into this I went in with an open mind and knew I wanted to make more than one layout using different features that way I can give as full of a review that I could in the time alloted. 

What did I think of the software?  I liked it a lot.  It was very easy to use and you don't need to be a computer genius to make a layout.  Anyone can use this software.  It's a great and easy, mess-free way to preserve your memories. 

Adding embellishments, paper, etc. is very straight forward.  The software pretty much walks you through the process and doesn't leave you hanging there without a clue.  It's made with the beginner user in mind but can be used by all skill levels.  Even creating full albums is easy by choosing to use the pre-made templates.  

  At first I thought maybe the layout templates were too dated based off what was pre-loaded onto the software but I found that you can make your own layouts from scratch and purchase additional digi files from the My Memories website.  There are tons of digi packs to choose from.  The purchase process is really easy and you can even use Paypal for that quick checkout.

One thing I was concerned about was whether I could use the digital graphics I already owned.  The answer is YES.  As you can see from my Christmas layout, you can use any of your digital files.  You are not limited.  

Another thing I was wondering was can I use the My Memories digi files to print and cut?  The answer again is YES.  You are not limited to using the digi packs you purchase on just digital layouts.  I purchased a digi pack that contained embellishments and was able to download it to my computer, not into the software, and was able to make a card using the print and cut feature on my Silhouette.  

The online community is amazing!  I posted a picture of one of my first layouts and they were so helpful in giving me tips on how to make it better.  They really are a great community of scrappers.

One thing I need to clarify is that I didn't have too much time with this software so I am by no means an expert.  My digital scrapbooking skills are at the beginner level and there's so much more to this software than I was able to get to or even learn.  I recommend heading the My Memories gallery to really get an idea from some of the experts of what you can create!

My Memories are also on Facebook!  Tons of inspiration there too!
Click here to find My Memories on Facebook!


Here are some pros and cons I came across:

PROS
  • You an use digi files that you already own
  • When applying shadows to an embellishment or pictures you can add it to all of them at once
  • Very nice and helpful online community
  • Pre-made layouts
  • Pre-made templates 
  • Online store full of digi files!!
  • Can use the digi packs to create print and cut projects


CONS
  • When selecting an item and moving t, it doesn't move fluidly.  You can't see exactly where it is being placed
  • The preview screen is small on both the main screen and when selecting papers, embellishments, etc.
  • The program slows down when you have a lot of embellishments and elements on a page

Now on to the giveaway!!  Yay!!  
*does a happy dance*

My Memories has kindly offered to give away a copy of their My Memories digital scrapbook software v2 to one of my readers!!  That means one of you guys will be a lucky winner!

Giveaway Rules

 1.  Go to the My Memories website and check out their store.  

2.  Come back here and tell me what your favorite My Memories digital pack is.  Please leave a comment with your choice.  It can be a pre-made layout, free file, a pack of paper, a digi pack of embellishments...anything!  One comment per person.

3.  Not required but for an extra entry it would be AWESOME if you "liked" my Facebook page 19Eighty Expressions and leave a separate comment stating you did so or are already a fan.

4.  Also not required but for a third entry it would also be just as AWESOME if you followed my blog.  Leave a separate comment stating that you are a new follower or already one.

So there you have it.  THREE (3) chances to win!

One random winner will be chosen on Saturday, November 26th!  
Please remember to leave your email address when you comment so I can notify you if you've won.


Try My Memories Scrapbook Suite Digital Software out for yourself and save a total of $20 by using coupon code STMMMS9048.

This code will give you $10 off the software and a $10 gift card for use in the My Memories store!


Sunday, November 13, 2011

DCWV's November Stack-a-holic Template Challenge

I came across DCWV's website post the other day about their November template challenge.  I have been getting more and more into scrapbooking my pictures so this was a perfect opportunity to get a picture scrapped. 

For the challenge you just need to use DCWV stacks and make a layout based on the template posted.  Since I mainly buy DCWV stacks I was all set to get going on this.

Here's the template I had to base my page off:

Template by Susan from Sketch Savvy

Not too difficult and really pretty.

Here's what I came up with:


I used the Rustic Stack for this layout.  I love that paper.   

Umm, one thing I learned while making this layout.  Never, ever use the Sew Easy tool while you are distracted.  My husband came in and was talking to me as I was piercing my paper with the Sew Easy and as you can see, my top stitch line is totally crooked!  Boo to that!  He actually kept laughing at it after that.  Meanie!  Good news is my daughter decided she wanted to stitch the thread in so I let her do about half of it.  Whew, less work for me!  It's not thread but I can't think of the name for it at the moment.

Another oopsie I made was nt paying attention to the fact that this layout was for an over size picture.  OOPS!  Oh well, I adjusted and adapted it to a smaller picture.    

One new tool I used is the Epiphany Crafts Shape Studio scallop circle 25.  I made the puprle epoxy scallops shown in the second picture.  It works just like a punch but it sticks the epoxy to it at the same time.  Genius right!?

And of course another one of my favorite tools was used in this.  I used the Crop-a-dile to set the brads on either side of the title.

Well, off to submit my layout and go on a bike ride.  Hope you all enjoy your weekend.  Join in on DCWV's challenge if you have time!  It ends the 28th. 

Saturday, November 12, 2011

Exciting News!


I have some exciting news.  Last night I was asked to join the Trendy Twine design team!  It totally took me by surprise.  I really love their twine and use it quite often on my projects.  There's a blog you can follow  to get some twine-tastic inspiration and a Facebook page as well.  I will be working with some amazing and talented ladies.  I am so excited about it.  The owner, Lesley is pretty amazing.  She's really a sweetie.

Here's some of the projects I've done in the past using Trendy Twine:


Friday, November 11, 2011

Fall Pillow Box

One thing I am grateful for are the amazing friends I have.  I truly have surrounded myself with awesome people, all of whom I've known for many years and go as far back as junior high.  Each friendship began at different times in my life and while I've been at different stages in growing as a person.  Each friendship has held strong and I am so thankful for the support they give me in my times of need.  I made my latest SVG Attic design team project with this in mind and of course because of the time of year.


For this pillow box I used SVG Attic's Holiday Cheer Gift Boxes SVG collection which has some really really cute gift boxes.  In it you get the pillow box I used, Santa's sleigh, an ornament bag, and a gift card holder.  Perfect for the holidays.  

I also used the Pumpkin Patch SVG collection from SVG Attic to make the cutout of the pumpkin and the pumpkin die cut.  The cutout is backed with gold vellum.  I used a white gel pen to add "stitching" to the pumpkin die cut.

The right side is adorned with some Orange Truffle twine from Trendy Twine.  You can also find them on Etsy HERE.  Please note that the shop is closed until November 28th (vacation).

The sentiment is from My Thoughts Exactly's Many Thanks stamp set.  MTE stamps are for sure my favorite sentiment stamps around.  The quality is better than other stamps I have tried and they don't get discolored!  Also, the sentiment stamps super sharp and clearly. 

I added some orange buttons I bought for $2 at the Scrapbook Expo last weekend.  The store is called Scrapbuck.  They have some pretty good deals and free shipping right now with a $20 purchase.

The paper is from DCWV's Harvest Gathering Stack.  Did you hear they are opening a DCWV Deals website?  Look for that in the near future.  I am super excited to stock up on paper stacks that they don't sell around here anymore.

Enjoy your weekend and have a great Veteran's Day.  Remember to thank a veteran!

Wednesday, November 9, 2011

Epiphany Crafts Shape Studio


Have you checked out the Epiphany Crafts Shape Studio yet? I have finally used one and am in total love with it! I love how I'm able to create my own custom epoxy shapes using paper that coordinates with my project. No more having to hunt down the perfect embesllishment! I can make them on my own now. They are so easy to use and perfect for those little scraps you have stashed away. Check out this link for ideas on how to embelish your project with the Shape Studio.

I bought the Round 14 pictured above at Joann's online for $11.99 and the bubble pack for $2.99.  Not too bad I must say!  Then I went to the Scrapbook Expo this past weekend and picked these babies up. 


I am super excited to use these as well and of course to get all the other Shape Studio Tools that are available! 

I hope you get a chance to try them out.  Seriously, they are pretty amazing. 

Monday, November 7, 2011

Meet and Greet with SVG Attic


SVG Attic is coming up in the craft world!  Jessica, the owner, has been invited to do a meet and greet at Hearts n Crafts in Covina, CA.  I am so excited for her!  Her files will be showcased and used in an upcoming class in which Jessica will be demoing a few of her SVG files.  This is a make and take class so all the crafty ladies will get to try out SVG Attic's files and take their pretty creations home to show off. 

The link to the info is HERE!

Oh I forgot to mention....guess who else will be there.  Yours truly!  Jessica invited me to tag along.  Yay!  Hope to see you local ladies there!


Info:

Hearts-N-Crafts,etc 

916 N.Citrus Ave. Covina CA 91722

(626) 967-9036


SVG Attic Meet and Greet/Make and Take
Saturday, November 12, 2011
1pm - 4pm


Wednesday, November 2, 2011

Featured on the Mod Podge Rocks Blog!

Wow, I had no clue!!  I decided ot check my stats on here and noticed I had some traffic from the Mod Podge Rocks blog.  I couldn't remember habving ever linked anything there so I did a little investigating and saw my Halloween coasters featured!  So awesome! 

HERE  is the link.