CLICK HERE FOR FREE BLOGGER TEMPLATES, LINK BUTTONS AND MORE! »

Tuesday, December 27, 2011

Trendy Twine Giveaway


Need to stock up on some twine?  Here's your chance to do so for FREE!  Trendy Twine giving away spools of their Berry Red and Holly Green twine (pictured above).  You have a chance at winning one! 

How to enter:
1.  You must be a follower of the Trendy Twine blog.
2.  You must comment on the Holiday Giveaway post.

Extra Entries:
1.  Refer a friend and make sure they mention that you referred them in the comment they leave.
2.  Make sure you tell them they need to become followers of the Trendy Twine blog as well.
3.  If the person you referred wins then you will win as well!

Giveaway ends Wednesday, December 28th at 11 pm CST.
Two (2) winners, possibly three with the referral, will be chosen.
Winners will be announced the following weekend.

Saturday, December 24, 2011

Get Well Card

I made a quick get well card for someone near and dear to us who will be in the hospital for some time.  The news came as a huge blow and shock to us.  Unfortunately the person doesn't live in our state so we can't visit quite yet but for now I thought a sympathy card would make them feel loved and cared about. 


I actually didn't use a machine to cut out any of the pieces!  I cut a rectangle as the band-aid and rounded the corners with a punch.  I then ran it though my Cuttlebug with the Swiss Dots folder.  The raised part is on the underside of the band-aid.  I used foam squares for the padded part of the band-aid.  I stamped a heart onto red paper and cut it out by hand.  The stamp I used is not the best quality.  In fact I really don't like it but I don't have any sympathy stamp sets of good quality so I was kind of stuck with that. 

Friday, December 23, 2011

Quick and Easy Wine Bottle Topper

I can't believe Christmas is a few days away.  Agh!  Are you ready for it?  I am not at all!  I haven't bought any stocking stuffers nor have I wrapped presents.  I have a 10 year old on me all day about my procrastination.  Here's one way I plan to dress up a gift that I have yet to get!

I made a quick and easy wine bottle topper for my SVG Attic DT project.   


For this project I used Holly's Holiday Gift Boxes and Stocking Stuff from SVG Attic.  

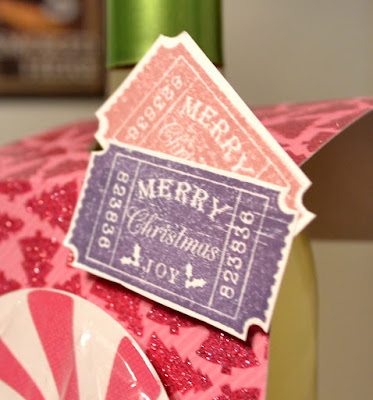
From the gift box set I used the backing to the candy apple gift box as the actual bottle topper (the pink part with the sparkly trees).  I cut it at about 10" x 4" (give or take).  I also had a hole cut out at the top of the topper so it would slide on easily.  I scored either side of the hole and folded it over to make three sections.

As decoration I used the top to the peppermint candy gift box from the Stocking Stuff collection.  I then wrapped it in cellophane and tied off the sides with some Trendy Twine to make it actually look like a peppermint candy.

The stamped tickets are from Unity Stamp Co.   I hand cut them after I stamped them on white paper. 

Well, that's it for this project!  I hope you liked it.  Now to buy the wine that this pretty topper is to adorn.  Hmm, maybe I'll get some Lambic instead!

~Kasi

Monday, December 19, 2011

Christmas Joy

I have been quite the lagger lately haven't I?  I haven't been feeling well lately so I have had no urge to craft.  I did get DT project done yesterday though.  Today's post is a card you may have seen before.  I was in a Christmas card making frenzy awhile back for that craft fair I participated in and this is one of the cards I made.  Super easy card to make.


Sunday, December 18, 2011

Santa Came Early

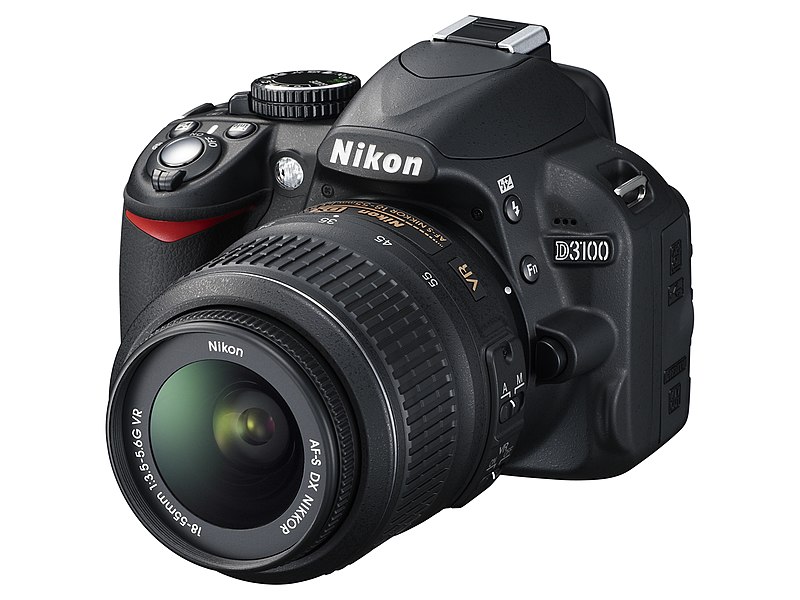
Santa decided to make a stop at my house before the 25th.  He must have known that I have been dying for this particular thing for 2 years or so.  He FINALLY delivered.  Woohoo!  Here's the newest addition to the family.


Now maybe I can take some decent pictures of my projects.  I have been feeling pretty bad about the quality of my project pictures and drool over all the awesome pictures I see out there taken with fancy cameras. 

Friday, December 9, 2011

Gifts From the Heart Blog Hop

I am so excited you decided to join myself and all the SVG Attic Design Team members for this amazing hop.  Each project featured in the Gifts From the Heart Blog Hop will be an item that can be given as a gift for the holidays or any other time.
If you came from Ruthie's blog then you are on the right track!  If not, head on to the beginning (SVG Attic's blog) which can be found here.

I found some inspiration online and made a cocoa mug gift box...err, gift mug.


Uh Oh!

Packaging

Goodies!

Tag

The handle


And what exactly is in the mug o' goodies?


A little bit of this and a little bit of that to make some yummy hot cocoa!


Here's a closeup of the top of the marshmallow baggie.


For the cocoa mug I used the pillow box SVG from SVG Attic's Holiday Cheer Gift Boxes.  I got the instructions on making the mug from Split Coast Stamper's.  You can find the instructions here.

The tag in the front is from the Holiday Cheer Gift Boxes as well.

The cute gingerbread man is from the Santa's Little Helper SVG collection.

I made the baggie top myself by just cutting a strip of cardstock, folding it over on a sandwich bag and then stapling it.

Now on to the good stuff!  
Want to win some goodies?!  Enter for a chance to win one of two $50 gift cards to SVG Attic.  All you have to do is the following:

Rules:
1. Become a follower on the SVG Attic blog
2. Become a follower of every blog on the hop
3.Leave a comment on every blog 

Extra entries:
1.  Become a follower of SVG Attic on Facebook (1 entry)
2.  Share on Facebook about our blog hop and tag SVG Attic in the post. (1 entry per share)

To get started on your SVG Attic-inspired Xmas gifts use the coupon code "GIFT" to save 50% off your purchase!


Now it's time to keep on hopping!  Head over to Jessica L's blog next!

Here's the line up in case you get lost:
                 Kasi 19eightyexpressions <--YOU ARE HERE


I hope you enjoyed my project!

~Kasi

Friday, December 2, 2011

Twine Ornaments


I mentioned awhile back that I would be starting my stint on Trendy Twine's design team in January.  Well, they have graciously asked me to post as a guest designer this month.  Of course I said yes!  

For my first Trendy Twine project I decided to make something a little different than I normally make, ornaments made out of twine! Oh yea, you can make some pretty stuff with twine!  It's a perfect project to do with the kids.


I made some in traditional colors.....


Peppermint Stick Twine

Twisted Lime Twine w/a hint of Peppermint Stick


And some in not-so-traditional colors....


Blueberry Twine

Blue Berry Twine
My husband helped me make them.  He thinks his is better!  Hmmph.  He really enjoyed making them and actually sad he wants to make more.  Crazy...my husband want to help me with a craft project?!  Unheard of!   

 I was thinking of glittering up these babies but decided against it since it may hide the pretty twine and unfortunately I didn't think to adorn these with pretty buttons or other embellishments until after I took these pictures (you know how time-consuming that is!) so here they are in all their naked glory.  I think adorned or not they are super cute.

Keep on reading to learn how to make these cute and simple ornaments!


HOW TO:

Ingredients
  • Small water balloons (yea, I made a mistake and used bigger balloons.  Unless you want giant ornaments or to use a ton of twine then use water balloons.) 
  • White glue
  • Water
  • Small bowl
  • Trendy Twine
  • Wax paper
  • Ribbon
  
1. Blow up balloons to to desired size and tie ends.
2. In a small bowl make a solution of 2 parts glue and 1 part water.
 
3. Coat the twine with glue and squeeze out the excess.
4. Wrap twine around balloon in in desired pattern, leaving some openings all around.
5. Lay twine ball ball on wax paper to dry and rotating every few hours to allow all sides to dry.
6. When completely dry, pop balloon and remove the deflated balloon from an opening in the cording.
7. Loop ribbon or additional twine through an opening in the ornament to hang.
8.  Embellish with glitter, buttons, etc.


You can use multiple colors of twine to make it a colorful and even more interesting!

I hope you try it out.  There's so much you can do to decorate these and pretty them up some more.  They'll look great on your tree and you can color coordinate them to match your decor!  Actually you can even throw these in a bowl or something and place in the middle of a table as decor.

ENJOY!!

P.S. If you try this out I would love to see your creations!


~Kasi

Thursday, December 1, 2011

SVG Attic December Color Challenge


SVG Attic holds monthly color challenges which are super fun to join in on.  It's super simple to get into.  Head to the blog challenge post which can be found HERE, check out what colors are announced, the rules, and create away using those colors and SVG Attic files!  Once you're done link your project and enter for a chance to win some cool prizes.  Remember, this is monthly so you have plenty of chances to participate and win.

Before I go on with my project I wanted to remind you to join SVG Attic for the Gifts from the Heart Blog Hop next week starting December 9th!

On to the project!

I decided that I wanted to take a break from traditional Christmas colors so for the December SVG Attic color challenge inspiration I made a quick Christmas card...in pink!  


Cute right?  I used the stocking gift card holder from the Cookies for Santa SVG collection for the pretty pink stocking.  I tweaked it a bit to make into a regular die cut rather than a gift card holder. 

The twine is from......you guessed it.....Trendy Twine.  I used the Strawberry Cupcake twine.  Love that color!  By the way they came out with two new Christmas colors.  Check them out.  I can't wait to play with them.

The paper is from the Jingle Bells paper stack by Recollections.  I topped off the pretty in pink card with some buttons I scored at Scrapbuck.com for $2 a pack.  

Ooh, so you like the little clothespin do ya?  Wanna know where I got that cute thing?  I actually got it from a local scrapbook store but found out and confirmed that Walmart has them in the kids craft section for pretty cheap.  I think you can get 50 for $1.99!  I know you want to stock up on them.  They are the cutest little things ever. 

So awhile back I mentioned I joined the Trendy Twine design team.  Well, this Friday is my very first post.  I'm *technically* not official yet and will be posting as a guest designer but come January 1st I will be the real deal!  Woohoo!!  I will be doing a twine giveaway along with my post so make sure you stop by for your chance to win! 

~Kasi


Sunday, November 27, 2011

Christmas Is Upon Us

This past holiday weekend I got a little taste of Christmas.  My mother-in-law came down from Utah and brought us all gifts.  I had to think quickly as to what  should give her.  I am one of those last minute people so that morning I set to work thinking.  It was either get her some type of scrapbooking item (she's a crafter as well) or make her something I love giving her handmade gifts because she really has a deep appreciation for them.  

I chose the harder route and made her something.


I ALMOST didn't give this to her.  I wanted to keep it so bad!  It tuned out so pretty.  The pictures don't do it justice at all.  When she saw her gift the my sister-in-laws ooh'd and aww'd over it too and said they were putting in an order for one too.  Funny ladies. 

I purchased the frame at the Salvation Army for under $2.  It actually is supposed to have two more picture slots where the tree and tag is but I decided not to cut those out because it looked too over crowded with three pictures in one frame.

I used DCWV's Mrs. Claus' Kitchen Stack for the background paper and the tag and Mod Podge to seal the paper onto the frame.  I threw in some buttons, ribbons, bling, and Trendy Twine's Peppermint Stick twine.  I also used one of my favorite tools, Epiphany Crafts Shape Studio for the yellow epoxy star and the round green embellishments on the tag. 

BTW, the links above, except the one for Trendy Twine, lead you to Joann's website because each item I linked is on sale with free shipping.  Take advantage of the sale while you can!

Trendy Twine is having a sale as well.  Use coupon code "AFTERTHANKSGIVING" to receive 15% off any $25 twine purchase now through Monday.

Now onto my next item.  I received a laminator from my mother-in-law...what can  use it for?  I can laminate bookmarks...that's all the ideas I have.

~Kasi


Thursday, November 24, 2011

Snowman Frame


I hope you all had a great Thanksgiving (for those of you who celebrated).  My day was full of family, food, and fun.  I tried my hand at some 10pm Black "Friday" shopping (on a Thursday!) and turned my happy butt right back around and drove home when I saw the people lose their minds in Walmart over some video games.  It was nuts.  I used to be a seasoned Black Friday shopper but I just can't handle it anymore.  Anyway, for those of you who braved the madness, I hope you got what you wanted!

Today is my SVG Attic design team project day.  Yippee.  I made a bit of home decor since I have absolutely none for Christmas.  Sure I have a tree and ornaments but...well...that's about it.  I decided it was time to make something festive to display in my barren house.  


I got the very pretty white frame from the dollar store (score!) for a whopping $1 (duh).  Not too shabby eh?  It's about 7"x7" in length and width.  

The background paper came from DCWV's Christmas & Winter Stack. 

The snowman is from SVG Attic's Build a Snowman collection.  Isn't he adorable  I stamped Mr. Snowman's eyes on using Peachy Keen's Simple Sallies ou Face Assortment

I had cut the "BELIEVE" that's at the top of the frame for another project I did this past weekend and I saved all the cutout letters.  Good thing I did because it goes perfectly with this framed snowman.  

The snowflakes are confetti-like pieces I've had since last Christmas.  I knew those babies would come n handy again one day!

I hope you enjoyed this project.  Look for my next project very very soon!  I made a gift for my mother-in-law which I think you'll love.  I seriously did NOT want to give it away.  

Also, remember to enter for your chance to win a free My Memories Scrapbooking Software Suite!  Click HERE for details.   

Enjoy the rest of your weekend!

~Kasi

Sunday, November 20, 2011

My Memories Digital Scrapbooking Software GIVEAWAY & REVIEW


Recently I was given the opportunity to try out My Memories digital scrapbooking software.  I jumped at the opportunity since I like trying new things and what better time to try it than when I am very much into making layouts again.  It really was perfect timing. 

I tried out the software using different methods, meaning when I made layouts I used not only what the software came with but I also used files I purchased from My Memories and also digi files I already had on my computer.  Yup, you can use files you already own!  Details will be given after each picture posted.

Using digi files that came free with software


The first layout I made was using the files that came with the My Memories software.  Each element and embellishment, with the exception of the pictures, was pre-loaded onto the My Memories software.

Using digi files I already owned

 
The background papers are from Jessica Sprague and all the embellishments came from Lettering Delights.  I made this layout so you can see how you can mix and match digi files you own and also use the My Memories digi files as well.  You're not limited to only using My Memories' digi files.  

Using a pre-made layout

Don't feel like taking a ton of time to make a layout?  No fear, My Memories is here!  I used a pre-made layout that My Memories has in it's digi store called Aloha Quick Pages.  All I did for this layout was add the pictures and the title and I was DONE!  So super easy.  This particular pack came with four pre-made layouts in total and you can get them in both a 12"x12" format or 8.5"x11".  Pretty cool for those lazy days.  

Using digi files from My Memories online store


I made this last layout using the I Am Thankful digi pack I purchased from My Memories.  There were a ton more embellishments that came with this pack but I didn't want to crowd the layout too much.  

Using My Memories to make a card


Yup, a card!  I used the I Am Thankful digi pack and the print and cut feature on my Silhouette to create this holiday card.  You're not limited to just making layouts, as you can see here.  You can even make a physical layout using print and cut and the My Memories digi packs, tags, etc.  


With this software you can make whole albums using premade layout templates where you just add the background and embellishments to each page.  The picture below shows the album I was creating and the layout of each page.  You can change it up if you want.  Drag and drop your pictures and start embellishing!


Here's an example of a premade template up close.  I used a template similar to this to make my Thanksgiving layout. 


REVIEW 

I enjoyed trying a new way to scrapbook.  I am a traditional scrapbooker and have never scrapbooked using digital software before.  When I went into this I went in with an open mind and knew I wanted to make more than one layout using different features that way I can give as full of a review that I could in the time alloted. 

What did I think of the software?  I liked it a lot.  It was very easy to use and you don't need to be a computer genius to make a layout.  Anyone can use this software.  It's a great and easy, mess-free way to preserve your memories. 

Adding embellishments, paper, etc. is very straight forward.  The software pretty much walks you through the process and doesn't leave you hanging there without a clue.  It's made with the beginner user in mind but can be used by all skill levels.  Even creating full albums is easy by choosing to use the pre-made templates.  

  At first I thought maybe the layout templates were too dated based off what was pre-loaded onto the software but I found that you can make your own layouts from scratch and purchase additional digi files from the My Memories website.  There are tons of digi packs to choose from.  The purchase process is really easy and you can even use Paypal for that quick checkout.

One thing I was concerned about was whether I could use the digital graphics I already owned.  The answer is YES.  As you can see from my Christmas layout, you can use any of your digital files.  You are not limited.  

Another thing I was wondering was can I use the My Memories digi files to print and cut?  The answer again is YES.  You are not limited to using the digi packs you purchase on just digital layouts.  I purchased a digi pack that contained embellishments and was able to download it to my computer, not into the software, and was able to make a card using the print and cut feature on my Silhouette.  

The online community is amazing!  I posted a picture of one of my first layouts and they were so helpful in giving me tips on how to make it better.  They really are a great community of scrappers.

One thing I need to clarify is that I didn't have too much time with this software so I am by no means an expert.  My digital scrapbooking skills are at the beginner level and there's so much more to this software than I was able to get to or even learn.  I recommend heading the My Memories gallery to really get an idea from some of the experts of what you can create!

My Memories are also on Facebook!  Tons of inspiration there too!
Click here to find My Memories on Facebook!


Here are some pros and cons I came across:

PROS
  • You an use digi files that you already own
  • When applying shadows to an embellishment or pictures you can add it to all of them at once
  • Very nice and helpful online community
  • Pre-made layouts
  • Pre-made templates 
  • Online store full of digi files!!
  • Can use the digi packs to create print and cut projects


CONS
  • When selecting an item and moving t, it doesn't move fluidly.  You can't see exactly where it is being placed
  • The preview screen is small on both the main screen and when selecting papers, embellishments, etc.
  • The program slows down when you have a lot of embellishments and elements on a page

Now on to the giveaway!!  Yay!!  
*does a happy dance*

My Memories has kindly offered to give away a copy of their My Memories digital scrapbook software v2 to one of my readers!!  That means one of you guys will be a lucky winner!

Giveaway Rules

 1.  Go to the My Memories website and check out their store.  

2.  Come back here and tell me what your favorite My Memories digital pack is.  Please leave a comment with your choice.  It can be a pre-made layout, free file, a pack of paper, a digi pack of embellishments...anything!  One comment per person.

3.  Not required but for an extra entry it would be AWESOME if you "liked" my Facebook page 19Eighty Expressions and leave a separate comment stating you did so or are already a fan.

4.  Also not required but for a third entry it would also be just as AWESOME if you followed my blog.  Leave a separate comment stating that you are a new follower or already one.

So there you have it.  THREE (3) chances to win!

One random winner will be chosen on Saturday, November 26th!  
Please remember to leave your email address when you comment so I can notify you if you've won.


Try My Memories Scrapbook Suite Digital Software out for yourself and save a total of $20 by using coupon code STMMMS9048.

This code will give you $10 off the software and a $10 gift card for use in the My Memories store!


Sunday, November 13, 2011

DCWV's November Stack-a-holic Template Challenge

I came across DCWV's website post the other day about their November template challenge.  I have been getting more and more into scrapbooking my pictures so this was a perfect opportunity to get a picture scrapped. 

For the challenge you just need to use DCWV stacks and make a layout based on the template posted.  Since I mainly buy DCWV stacks I was all set to get going on this.

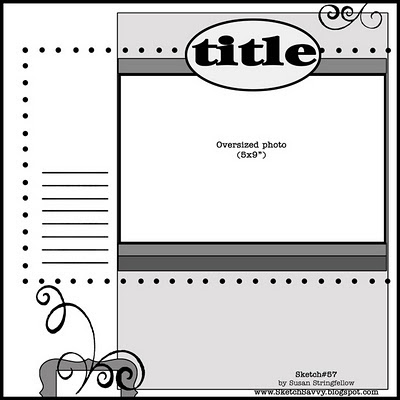
Here's the template I had to base my page off:

Template by Susan from Sketch Savvy

Not too difficult and really pretty.

Here's what I came up with:


I used the Rustic Stack for this layout.  I love that paper.   

Umm, one thing I learned while making this layout.  Never, ever use the Sew Easy tool while you are distracted.  My husband came in and was talking to me as I was piercing my paper with the Sew Easy and as you can see, my top stitch line is totally crooked!  Boo to that!  He actually kept laughing at it after that.  Meanie!  Good news is my daughter decided she wanted to stitch the thread in so I let her do about half of it.  Whew, less work for me!  It's not thread but I can't think of the name for it at the moment.

Another oopsie I made was nt paying attention to the fact that this layout was for an over size picture.  OOPS!  Oh well, I adjusted and adapted it to a smaller picture.    

One new tool I used is the Epiphany Crafts Shape Studio scallop circle 25.  I made the puprle epoxy scallops shown in the second picture.  It works just like a punch but it sticks the epoxy to it at the same time.  Genius right!?

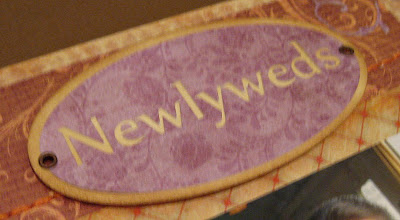
And of course another one of my favorite tools was used in this.  I used the Crop-a-dile to set the brads on either side of the title.

Well, off to submit my layout and go on a bike ride.  Hope you all enjoy your weekend.  Join in on DCWV's challenge if you have time!  It ends the 28th.