CLICK HERE FOR FREE BLOGGER TEMPLATES, LINK BUTTONS AND MORE! »

Friday, September 30, 2011

Halloween Coasters - Spook-tacular Blog Hop

Thank you so much for joining SVG Attic on their very first blog hop!  I hope you enjoy all of the spook-tacular projects that you will see which just happen to be made by some of the most awesome and talented ladies I know.  

So are you ready for more hopping?  Well, you've made it to the right place if you came from Ruthie's blog.   If you are just starting the blog hop then hop on back to the beginning which is HERE at the SVG Attic blog.

Now on to my project!

For the hop I made decoupage ceramic tile coasters, each with a spookily cute character from the Spooky Friends collection.


For instructions on how to make decoupage tile coasters visit my post HERE.  I did everything the same as in that post except added some additional spookily cute designs to my tiles.  You like?  Oh and yes, these tiles are waterproofed and full functional.  A perfect addition to you Halloween decor!


I know when it comes to hops you all like prizes.  Who doesn't right?  Well, this hop is no different.  For participating in this hop you have a chance to win a $10 gift certificate to SVG Attic.  My only requirements are:

1.  Become a follower 
2.  Comment on this post. 


That's all.  Super easy.  You have until end of day Sunday October 2nd to leave your comment. The winner will be revealed Monday and will be chosen at random.  Since it's so easy you have no excuse NOT to comment right?  :)

Oh AND there's also a grand prize, a $30 gift certificate from SVG Attic, so make sure you visit all the blogs and comment on the projects for your chance to win!


Next up on the agenda, for the duration of the hop (September 30 - October 2), use coupon code "SVGHOP" to save 30% off your total purchase.  Also don't forget to join in on the SVG Attic contest going on now.  Get the info HERE.
Here is the blog line-up.
Jessica B. 
Ruthie 
(me)------>Kasi  <----- (me)
Anna Dawn
  Jessica L.
Raven
Cristina
 Your next stop on the hop is the awesomely talented 
Anna Dawn
Thank you so much for joining us on the hop!


Thursday, September 29, 2011

MTE: Guest Designer

Fall is here...well, not in CA exactly.  It's still hot but I'll just pretend we have east coast weather and changing leaves while I post this.  With fall comes the start of the holiday season.  Can you believe it!?  Since fall seems to be on everyone's minds lately I made a card that is quite fitting.  To tell you the truth I'm not exactly ready for summer to be over but oh well, guess no more beach cards for a few months.  Darn!

Awhile back I was invited to be a guest designer for My Thoughts Exactly which is an up and coming stamp company.  I have designed for them once so far back in July.  I made an ice cream cone waterfall card that you can see here.  For today's project I made a card as well.


I used the Sweet Thoughts stamp set from My Thoughts Exactly for the "give thanks" sentiment.  The best thing about these stamps is that you can mix and match words and phrases.  It gives you so many options!  You can even mix and match between the sets.  They stamp so clearly and sharp and clean up so easily.  I highly recommend trying a set out.  I think you'll fall in love!

The paper comes from DCWV's Ghost's and Goblins Stack and the Harvest Gathering Stack.  I used kraft paper for the base.    

I used two different twine colors from Trendy Twine, dark blue with light blue and white and also the Thanksgiving Bakers Twine, as a border or frame.  The colors came together quite well.

I finished of the card with two cute little buttons adorned with some hemp twine.

I hope you enjoyed this card.  Come back tomorrow for the SVG Attic Spook-tacular Blog Hop where you will get to see some great Halloween projects!


Friday, September 23, 2011

Announcement & Design Team Project Friday

Well, I told you I had a big announcement and today is the day you get to find out what it is! It actually has nothing to do with paper crafting, cards, scrapbooking, etc. Sorry to disappoint if that's what you were looking forward to. I actually think it's better news than anything that has to do with paper. :)

Since it's my day to design for SVG Attic I decided to combine my announcement with my DT project. Ready for it?


Can you guess who? Hehe, it's me silly! After two long years (to the month!) we are ecstatic to announce that we are expecting child #2! This is going to be an interesting new addition. My daughter is already 10 and will just about be 11 when baby Blueberry Nugget Bean (long story) is born so there's a huge gap in age. It's actually nice though because I will have an automatic live-in nanny! Hahaha. This child is going to be annoyed by this baby before it's born if I keep teasing her!

This is my excuse for being around a lot less lately.  I have been absolutely exhausted!  I'm still in my first trimester and I really hope this fatigue goes away.  It's zapping ALL my energy and creativity from me.  My mind draws blanks when I try to think up something to make.  This better go away soon or I'll have a craft room that never gets used.  :(  *sigh*

On to the details of the announcement card.

I used the Tent Cards from SVG Attic as the base of the card. I also used the Give a Hoot collection from SVG Attic for the 3D owl inside the tent card. I added glitter to the owl's eyelashes to bling her out! I used some pink and white Trendy Twine as a border for the frame where the owl sits behind. The front circles were actually the left overs from the cut of the card. I decided to recycle and use it as a slide window. I used my Sew Easy to stitch the floss around the outter circle to create a border. I set some snaps that I purchased on Etsy from wickedwoolgathering with my Crop-a-dile. I added a pink brad to the top so the outter window can slide up to reveal the rest of the message.

That's about it for this project and announcement! Stop by SVG Attic and browse around. You won't be disappointed! New sets are always being released!

Wednesday, September 21, 2011

A little explanation

Lately it's been pretty quiet around here and on my Facebook fan page. I explained a little on Facebook about what's going on but I havent' revealed everything yet. I have been working on some projects for a friend and also for my house so I have been concentrating on those two things lately. I am hoping once that's all finished I'll be back and at it as usual. That of course is dependent on some big news I have for you. Look for that news on Friday when I post my SVG Attic design team project. This news will kind of give you a heads up on why I REALLY haven't been around much.

Sunday, September 11, 2011

We Remember


I don't think any of us will ever forget that fateful day.  All of us who were old enough to comprehend what was going on will always remember that day and what we were doing.  Those images will never leave us.

My day started off as any other.  I was up at zero dark thirty getting ready for work.  I always watched the news in the mornings so as usual I had the TV tuned on to a local news cast.  What I saw was a tall building on fire.  My family is from New York, I was born there, I had been there countless times but I had no clue what the World Trade Center was.  I didn't think too much of it at first.  I remember the newscasters saying they thought a small private airplane may have hit the building....then the second plane hit right there before our eyes.  My jaw dropped.  I knew then something was terribly wrong.  I looked down at my uniform and knew...

I had a newborn at the time and a husband overseas in Japan.  My baby was only a few months old.  As I was about to head out the door I looked at her sitting in her car seat and told her I was sorry.   After seeing what I saw I was sorry she would have to grow up in such a chaotic world.  After I dropped my daughter off at daycare I headed into work with the news blasting in my car.  I was still in shock.  I knew we were under attack.  We were vulnerable.  I was scared.  As I drove through the back gate of  Marine Corps Base Camp Pendleton the distressed radio DJ was yelling that the Pentagon was hit.  I knew....we were under attack.  I remember staring up at the sky during the rest of my drive to work waiting for a plane to hit us too, to hit the airfield right across from where I worked.  

Many of us Marines in my shop were in a state of stunned shock.  We didn't get any work done that day.  We huddled around the radio listening to the coverage of the horrific events unfolding.  We were at war and we knew it would be us who would be at the forefront of the fight.  In the days, weeks, and months that followed the morale was high.  Everyone was ready to go.  The atmosphere on the base was charged.  We were ready.  

It was a tragic day.  A day meant to hurt us.  A day meant to kill our morale.  So many innocent lives lost for no good reason.  A heart wrenching day.  The attack did hurt us.  It did kill our morale but not for long.  As a country we came together as one.  The events of September 11, 2011 will always be remembered by us.  We will always remember the victims even if we did not know them personally.  We will always remember and honor those who have fallen serving our country before, during, and after (military, fire, police, emergency personnel).  We will always remember the men and women who were there to help.  We will always remember.  

Friday, September 9, 2011

Pumpkin Patch Mini Notes

Welcome to another Friday! Today I have a cute little project for you but first a few things. If you look to your left you will notice that I have made blog button. You can grab it and add it to your blog if you want. To the right I added a blinkie. It's for the Spook-tacular SVG Blog Hop that I, and a lot of talented ladies, will be apart of. It's going on September 30th through October 2nd. Make sure to mark your calendar and hop along with us! On to my project. I'm still obsessed with kraft paper. I know, I know....still!? I can't help it. I keeps calling my name every time I sit at my craft table. I used one of SVG Attics' new sets, Pumpkin Patch SVG Collection, to make some mini note cards that are perfect for fall. Take a look at the adorable collection!


And here are the mini note cards I made using that awesomely cute collection.


The mini note cards are pretty small and measure 2.75" x 3.5". I used one of each of the pumpkins from the Pumpkin Patch SVG Collection so each mini note was slightly different. I shaded each piece of the pumpkin with Tim Holtz' distress inks to give each little guy some depth. I also used sandpaper to add a little more depth and additional color. I was contemplating adding twine but I decided against it. I kind of like these little cards naked! I hope you enjoyed today's project! Remember to mark your calendar for the blog hop and to grab my blog button! Also, check out SVG Attic for more awesome SVG collections. There is ALWAYS a new set being released so you definitely won't be disappointed!

Tuesday, September 6, 2011

More Decoupage Tile Coasters

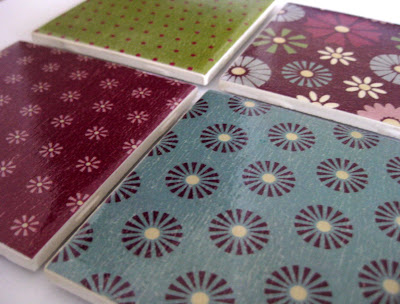
Decoupage coasters, I love them! I like making them and they turn out so pretty!! I love that I can customize them to fit pretty much any decor. Here's a fresh new set I made.


Tip Junkie handmade projects

Monday, September 5, 2011

Mod Podge Tile Coasters

I have been seeing tile coasters all over Pinterest lately and it has piqued my interest.  I think they are the coolest things.  I looked into how to make them and it's fairly easy.  You need some tile coasters, Mod Podge, acrylic sealer, and a backing for the coasters so it doesn't scratch your table, and paper.  I set to work on these babies last night and let them sit over night to dry.  They dry fairly quickly.


What do you think?  Cute right?

Supplies:


Ceramic Tiles (4.25" x 4.25" tiles cost me $0.14 - $0.16 each at Home Depot)
Paper (it can be napkins, gift wrap, scrapbook paper, any type really)
Mod Podge
Acrylic sealer (I bought clear gloss acrylic wood finisher from Home Depot)
Felt pads (you can use foam or other types of backing as well) 

Instructions:

I cut squares of scrapbook paper from the DCWV Citrus Stack into 4.25" x 4.25" squares to fit onto the tiles.

Apply a coat of Mod Podge to the tiles and placed the paper on top.  Let dry for 15 minutes.

Apply a thin coat of Mod Podge on top of the paper.  Let dry for 15 minutes.

Repeat 2-3 times. 

Spray with acrylic sealer.  Let dry for 30 minutes.

Repeat 3 times or according to directions on can.

Adhere felt pads to back of coasters.

That's it!  Now you have super cute coasters to use or give as gifts!

Tip Junkie handmade projects