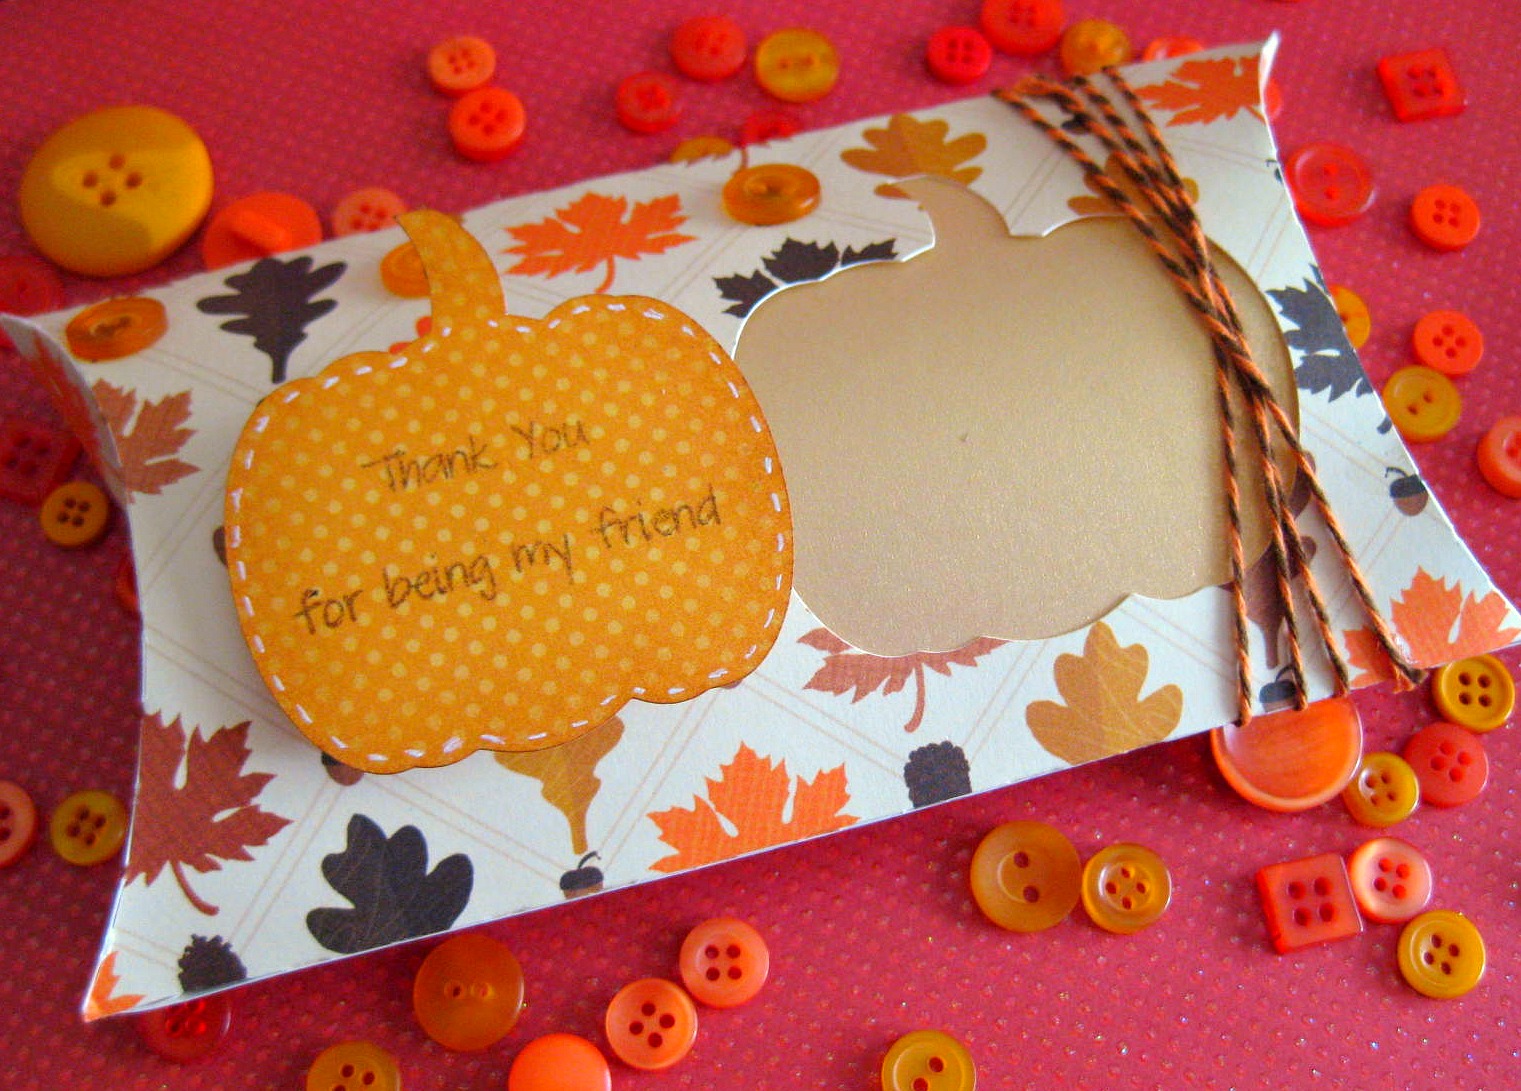
One thing I am grateful for are the amazing friends I have. I truly have surrounded myself with awesome people, all of whom I've known for many years and go as far back as junior high. Each friendship began at different times in my life and while I've been at different stages in growing as a person. Each friendship has held strong and I am so thankful for the support they give me in my times of need. I made my latest SVG Attic design team project with this in mind and of course because of the time of year.
For this pillow box I used SVG Attic's Holiday Cheer Gift Boxes SVG collection which has some really really cute gift boxes. In it you get the pillow box I used, Santa's sleigh, an ornament bag, and a gift card holder. Perfect for the holidays.
I also used the Pumpkin Patch SVG collection from SVG Attic to make the cutout of the pumpkin and the pumpkin die cut. The cutout is backed with gold vellum. I used a white gel pen to add "stitching" to the pumpkin die cut.
The right side is adorned with some Orange Truffle twine from Trendy Twine. You can also find them on Etsy HERE. Please note that the shop is closed until November 28th (vacation).
The sentiment is from My Thoughts Exactly's Many Thanks stamp set. MTE stamps are for sure my favorite sentiment stamps around. The quality is better than other stamps I have tried and they don't get discolored! Also, the sentiment stamps super sharp and clearly.
I added some orange buttons I bought for $2 at the Scrapbook Expo last weekend. The store is called Scrapbuck. They have some pretty good deals and free shipping right now with a $20 purchase.
The paper is from DCWV's Harvest Gathering Stack. Did you hear they are opening a DCWV Deals website? Look for that in the near future. I am super excited to stock up on paper stacks that they don't sell around here anymore.
Enjoy your weekend and have a great Veteran's Day. Remember to thank a veteran!
Showing posts with label 3D. Show all posts
Friday, November 11, 2011
Fall Pillow Box
Labels:
3D,
Autumn,
Christmas,
design team,
dt,
Fall,
gift,
mte,
my thoughts exactly,
pillow box,
svg attic,
Thanksgiving,
trendy twine
Friday, September 23, 2011
Announcement & Design Team Project Friday
Well, I told you I had a big announcement and today is the day you get to find out what it is! It actually has nothing to do with paper crafting, cards, scrapbooking, etc. Sorry to disappoint if that's what you were looking forward to. I actually think it's better news than anything that has to do with paper. :)
Since it's my day to design for SVG Attic I decided to combine my announcement with my DT project. Ready for it?
Can you guess who? Hehe, it's me silly! After two long years (to the month!) we are ecstatic to announce that we are expecting child #2! This is going to be an interesting new addition. My daughter is already 10 and will just about be 11 when baby Blueberry Nugget Bean (long story) is born so there's a huge gap in age. It's actually nice though because I will have an automatic live-in nanny! Hahaha. This child is going to be annoyed by this baby before it's born if I keep teasing her!
This is my excuse for being around a lot less lately. I have been absolutely exhausted! I'm still in my first trimester and I really hope this fatigue goes away. It's zapping ALL my energy and creativity from me. My mind draws blanks when I try to think up something to make. This better go away soon or I'll have a craft room that never gets used. :( *sigh*
On to the details of the announcement card.
I used the Tent Cards from SVG Attic as the base of the card. I also used the Give a Hoot collection from SVG Attic for the 3D owl inside the tent card. I added glitter to the owl's eyelashes to bling her out! I used some pink and white Trendy Twine as a border for the frame where the owl sits behind. The front circles were actually the left overs from the cut of the card. I decided to recycle and use it as a slide window. I used my Sew Easy to stitch the floss around the outter circle to create a border. I set some snaps that I purchased on Etsy from wickedwoolgathering with my Crop-a-dile. I added a pink brad to the top so the outter window can slide up to reveal the rest of the message.
That's about it for this project and announcement! Stop by SVG Attic and browse around. You won't be disappointed! New sets are always being released!
Since it's my day to design for SVG Attic I decided to combine my announcement with my DT project. Ready for it?
Can you guess who? Hehe, it's me silly! After two long years (to the month!) we are ecstatic to announce that we are expecting child #2! This is going to be an interesting new addition. My daughter is already 10 and will just about be 11 when baby Blueberry Nugget Bean (long story) is born so there's a huge gap in age. It's actually nice though because I will have an automatic live-in nanny! Hahaha. This child is going to be annoyed by this baby before it's born if I keep teasing her!
This is my excuse for being around a lot less lately. I have been absolutely exhausted! I'm still in my first trimester and I really hope this fatigue goes away. It's zapping ALL my energy and creativity from me. My mind draws blanks when I try to think up something to make. This better go away soon or I'll have a craft room that never gets used. :( *sigh*
On to the details of the announcement card.
I used the Tent Cards from SVG Attic as the base of the card. I also used the Give a Hoot collection from SVG Attic for the 3D owl inside the tent card. I added glitter to the owl's eyelashes to bling her out! I used some pink and white Trendy Twine as a border for the frame where the owl sits behind. The front circles were actually the left overs from the cut of the card. I decided to recycle and use it as a slide window. I used my Sew Easy to stitch the floss around the outter circle to create a border. I set some snaps that I purchased on Etsy from wickedwoolgathering with my Crop-a-dile. I added a pink brad to the top so the outter window can slide up to reveal the rest of the message.
That's about it for this project and announcement! Stop by SVG Attic and browse around. You won't be disappointed! New sets are always being released!
Labels:
3D,
animals,
announcement,
card,
design team,
dt,
etsy,
girl,
inspiration,
mini notecards,
notes,
owl,
papermaking,
print and cut. birthday,
Silhouette,
svg attic
Monday, August 29, 2011
Pendant Banner Card
I love how pendant banner cards look. They are so simple yet so pretty if done right. I made one a few weeks ago by cutting and piecing together the pendants but this time I decided to try my had at designing my own pendant in Silhouette Studio. Ack, what was I thinking?! I'm not a graphic designer! I tried anyway.
It actually wasn't too hard once I got the bowed line to look decent. Once I got that part down I created some triangles and lined them up on the bowed line. I removed the bowed line and welded the triangles together and and had my pendant! I could have left the line but I decided against it and used twine instead to *hang* it.
Here's my lovely vintage-inspired card.
I used the print and cut feature in Silhouette Studio to cut the banner. I used the Distrezz-it-All on the edges then went over it to smooth it out a little with the Tim Holtz' manual distresser. I then lightly inked the edges, pendants, and twine to give the card an aged look. I decided against a sentiment stamp this time around. I like the look of it without one plus it can be used for any occasion without a sentiment.
So what do you think of my first venture in graphic design? Not too shabby for something so basic!
It actually wasn't too hard once I got the bowed line to look decent. Once I got that part down I created some triangles and lined them up on the bowed line. I removed the bowed line and welded the triangles together and and had my pendant! I could have left the line but I decided against it and used twine instead to *hang* it.
Here's my lovely vintage-inspired card.
I used the print and cut feature in Silhouette Studio to cut the banner. I used the Distrezz-it-All on the edges then went over it to smooth it out a little with the Tim Holtz' manual distresser. I then lightly inked the edges, pendants, and twine to give the card an aged look. I decided against a sentiment stamp this time around. I like the look of it without one plus it can be used for any occasion without a sentiment.
So what do you think of my first venture in graphic design? Not too shabby for something so basic!
Labels:
3D,
cards,
Silhouette,
trendy twine,
vintage inspired
Friday, August 26, 2011
Trick or Treat!
And here we are again. Welcome back and thank you for coming to visit! I hope you enjoy your stay. Aside from my project I have a few other tid bits (is that one word?) to share with you.
First order of business, SVG Attic is holding a design team call. Yea, Jessica got tired of us oldies and is looking for fresh new faces. I am just kidding. She loves us but she really is looking to expand her design team so that part wasn't a joke. I know you all want to work with super cool Kasi (me). Come on, you know you do!! On a serious note though, go apply. We are super cool and the most awesome design team ever (that's not a joke either)! Promise! Plus, you get free SVGs and get to participate in blog hops. My only requirement for you is that you have a sense of humor. Did that convince you yet? Do you meet my requirement (that's not a real requirement)? If so, head on over HERE!
Second, SVG Attic has been releasing mini SVG sets each time they reach increments of 100 on their Facebook fan page. Head over there and "Like" them now if you haven't already and get in on a chance to get some cute free SVGs.
OK, now on to what you have been waiting for, my project! Some background on it...the boss-lady (Jessica) said, "No more cards, think outside the box!" So I did that...literally. Hehe. Really though she is totally fine with me making cards. I stick to cards because I can always give them away to almost anyone. With 3D projects I can never figure out who to make them for. I know, a gift box or something but really I don't usually give out things like that. Guess it's time to start, huh? Well, thanks to Jessica I have actually come to enjoy making 3D paper things. Today's project is my very first SVG box and first Halloween project of the year! I know...already, right?!
I'm proud of my first box err, milk carton.
This spook-tacular milk carton gift box measures 5 1/2" tall. In MTC I sized it so the carton stayed proportionate. I used SVG Attic's Raven Claw Manor SVG kit for both the haunted house and the tag. The house is actually a box in the set but I played with it and just used parts of it so I could attach it to the milk carton from the Fun Favors SVG Collection.
I embossed both the roof and the door. Didn't those two pieces come out super cool? I really love embossing things. It adds so much more umph to projects.
The tag was actually a card in the Raven Claw Manor collection but I decided to make it into a tag for this project. I used a stamp I bought in the dollar bin last year from either Michael's or Joann's. The "or" got wet so the ink kinda splatted and I had to write it in...oops!
I used my Crop-a-dile to set the eyelets on the top of the milk carton and I tied it with some spooky orange and black twine from Trendy Twine. Word on the virtual street known as Facebook is that they are coming out with two new colors of twine! Keep on the lookout for those.
Last bit of news. There's going to be a few blog hops I'll be participating in within the next few months. I've never been in one so I'm stoked! Woohoo! See, yet another reason to try out for the SVG Attic design team!
First order of business, SVG Attic is holding a design team call. Yea, Jessica got tired of us oldies and is looking for fresh new faces. I am just kidding. She loves us but she really is looking to expand her design team so that part wasn't a joke. I know you all want to work with super cool Kasi (me). Come on, you know you do!! On a serious note though, go apply. We are super cool and the most awesome design team ever (that's not a joke either)! Promise! Plus, you get free SVGs and get to participate in blog hops. My only requirement for you is that you have a sense of humor. Did that convince you yet? Do you meet my requirement (that's not a real requirement)? If so, head on over HERE!
Second, SVG Attic has been releasing mini SVG sets each time they reach increments of 100 on their Facebook fan page. Head over there and "Like" them now if you haven't already and get in on a chance to get some cute free SVGs.
OK, now on to what you have been waiting for, my project! Some background on it...the boss-lady (Jessica) said, "No more cards, think outside the box!" So I did that...literally. Hehe. Really though she is totally fine with me making cards. I stick to cards because I can always give them away to almost anyone. With 3D projects I can never figure out who to make them for. I know, a gift box or something but really I don't usually give out things like that. Guess it's time to start, huh? Well, thanks to Jessica I have actually come to enjoy making 3D paper things. Today's project is my very first SVG box and first Halloween project of the year! I know...already, right?!
| Front |
| Back |
| Wooden door (embossed) |
| Trick or Treat!! |
This spook-tacular milk carton gift box measures 5 1/2" tall. In MTC I sized it so the carton stayed proportionate. I used SVG Attic's Raven Claw Manor SVG kit for both the haunted house and the tag. The house is actually a box in the set but I played with it and just used parts of it so I could attach it to the milk carton from the Fun Favors SVG Collection.
I embossed both the roof and the door. Didn't those two pieces come out super cool? I really love embossing things. It adds so much more umph to projects.
The tag was actually a card in the Raven Claw Manor collection but I decided to make it into a tag for this project. I used a stamp I bought in the dollar bin last year from either Michael's or Joann's. The "or" got wet so the ink kinda splatted and I had to write it in...oops!
I used my Crop-a-dile to set the eyelets on the top of the milk carton and I tied it with some spooky orange and black twine from Trendy Twine. Word on the virtual street known as Facebook is that they are coming out with two new colors of twine! Keep on the lookout for those.
Last bit of news. There's going to be a few blog hops I'll be participating in within the next few months. I've never been in one so I'm stoked! Woohoo! See, yet another reason to try out for the SVG Attic design team!
Labels:
3D,
design team,
dt,
Halloween,
Haunted House,
milk carton,
svg attic,
trendy twine
Subscribe to:
Posts (Atom)