CLICK HERE FOR FREE BLOGGER TEMPLATES, LINK BUTTONS AND MORE! »
Showing posts with label bookmark. Show all posts

Monday, January 7, 2013

Hello Kitty Bookmark

Hello all!  I am a guest designer over at September Ninth today.  Yea yea....I actually made something.  I'm not even going to say "I'm back" because I don't know about that yet.  Anyway, for today's project I used a cut file that Ruthie created from a coloring book page. 

Hello Kitty is quite the popular cat these days.  Actually, now that I think about it that cute white cat was popular back when I was a teen...all those years ago.  Now my pre-teen daughter and her friends swoon over it just like I did in the 90s.  I just hinted at my age there.  Did you catch that? 

Lately my daughter has been reading a lot.  She has nothing else to do while she sits and mourns the loss of her electronic use privileges.  Oh these pre-teen years!!  Since she is reading a ton and probably lost the other bookmarks I made her I decided to use this awesome Hello Kitty file to make her a new bookmark.  Here it is....


It was super easy to make.  I welded the Hello Kitty main body to a rectangle in MTC and sized all the parts at the same time to keep the measurements equal.  The bookmark is about 6" tall and 1.75" wide.

See the little kitty peeking out at you?

I have it on good word that Ruthie will be offering the Hello Kitty file for free.  Head on over to her blog grab it! 


Tuesday, February 21, 2012

Tasseled Bookmarks

Hello hello!  Kasi here with my latest Trendy Twine design team project.  My inspiration for this latest project is from something I love to do...read!  The book nerd I am just never seems to have a proper bookmark on hand for those times when I actually pick up a "real" book and not my Kindle.  I usually just grab an old receipt or whatever scrap of paper I can get my hands on to.  I finally decided to make myself a pretty bookmark!


I used Trendy Twine's new Chocolate Cupcake twine for the tassel.  Now usually when I make classic bookmarks like these I just throw on some ribbon or twine at the top but I never made a tassel before this.  I had to do some hunting around and found this blog which I felt did a great job in demonstrating through pictures how to make a tassel.

Hope you enjoyed this project and learned a new way to use Trendy Twine!!  For more great twine ideas visit the Trendy Twine blog

Friday, July 22, 2011

New Take on a Simple Project

Well well, the day is finally here.  It's my SVG Attic design team project day!  Woohoo!!  I look forward to these days.  As I mentioned in my Christmas in July post earlier this week I am obsessed with bookmarks all of a sudden.  That project was a bookmark and guess what today's project is. 

Any guesses? 

You guessed correctly!  It's a bookmark! 

Before you think to yourself, "Not another one, you just made one" let me explain.  These (yes, plural) are not the normal everyday bookmarks you see.  They are different than the one I made earlier this week.  Anyway, I have issues with making the same thing twice.  I get bored very easily so I am always on the hunt for new ideas, new techniques, new anything so these are different.  They serve the same purpose but have a different design.  What?  You want me to shush already and see some pictures?  OK, here ya go!


Set of four bookmarks


Pillow box

There's something a little different about these bookmarks
Tweet Tweet

Who Who


 They look like ordinary bookmarks don't they?  So can you figure out what's different about these?  Betcha can't......not yet at least.  Here's some *action* shots!


Corner bookmarks

The paper slips through an opening on the right.


Slip the book page right in there


How cool is that?  They are so easy to make too!  Here's a picture of the first one I made.  A very simple one for my daughter which really only took a few minutes to whip together.  


I used a piece of cardstock, a piece of patterened paper, and some eyelets.  Telling ya, super easy!

On to the nitty gritty of how I made these little guys!

As mentioned above, I used a piece of cardstock and a piece of patterened paper as the base for each bookmark.  From there I used my little creative brain to make each one different.  Each bookmark is 2" in width and 3.25" in height when folded and 4" x 6.5" unfolded.  The cardstock is folded in half like a card but you open it on the opposite side.  You can make the bookmark open up the other way as well.  The left side and top of each is secured so that only a small slit is created into which you can slide the book page into.  I decided to secure each differently so you can get some ideas.  I'll detail each one individually.
 

1. Tweet Tweet


I used the Birds and Bees Collection from SVG Attic which you can get HERE.  I sized the birdies down in MTC to fit the bookmark and they are about 1.5" by 1" each.  The sentiment stamp comes from the coordinating stamp set from My Thoughts Exactly called Birds and the Bees which you can get HERE.  The patterned paper is ColorBok which I bought from the Target dollar bin.  In fact all the paper is from the same pack.  Oh, and guess what I found out!  ColorBok has a warehouse not too far from me where they have clearance sales from time to time!  Yay me!  The twine I used to secure the left side is called Krazy for Kraft from Trendy Twine which you can purchase HERE.  I punched holes in the side and threaded the twine through.  The looped ribbon at the top is looped and is from American Crafts.


2. Pretty Tree


The tree is from Give a Hoot SVG Collection from SVG Attic and is sized to just under 1.75" x 3".  The sentiment stamp is from the My Thoughts Exactly Birds and the Bees stamp set.  I secured the left side of the bookmark with eyelets that I set using a Crop-a-Dile.  I criss-crossed some brown bakers twine from Trendy Twine around the trunk of the tree.


3.  Hoot Hoot


The owl is from SVG Attic's Give a Hoot CollectionI welded him to the top of the bookmark in MTC.  To make sure he's stable it's best to weld him at equal intervals on the full length of the bookmark (unfolded) in MTC and then fold together when cut.  If you don't you have a poor owl that is falling off his perch!  He's 1.25" x 1/5".  The sentiment stamp comes from My Thoughts Exactly Birds and the Bees stamp set.  I sewed the left edge and top together using a sewing machine. 


4.  Birdie House 


The birdhouse comes from the Birds and Bees Collection at SVG Attic and is 1.5" x 2"I looped the brown twine around where the bird house entrance holes are and looped some of the lighter brown twine at the top.  The twine is from Trendy Twine. Hmm, are you seeing a *trend* with the twine?  Yes, I LOVE their twine!  To secure the side and top I glued the bookmark edges.

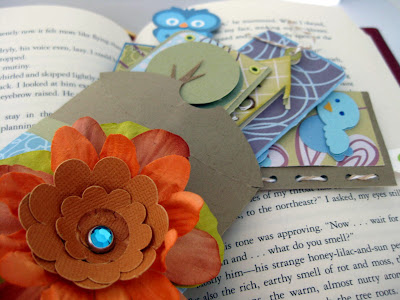
That about does it...sort of.  Just one more element to talk about.  The pillow box!


To fit the bookmarks in the pillow box I had to size the box in Silhouette Studio to just about 7.5" x 7.5".  I folded up the pillow box along the scored lines and went on my merry way decorating it.  I used the flower from the Mad Tea Party Kit SVG Collection from SVG Attic.  I centered it on three different paper flowers and topped it off with a blue jewel brad.  I used a strip of cardstock and a strip of patterned paper around the pillow box and wrapped some green twine from Trendy Twine around it as the finishing touch.

OK, really that is it!  Whew, that was long!  Now to figure out who to give this to!


Tuesday, July 19, 2011

Christmas in July

It's Christmas in July here in my little craft room.  Yes, get those gifts ready because Christmas will be here in no time!  I have already been working on my little gifts.  To tell you the truth...the people that will be getting them probably will see this here or on Facebook so they won't be much of a surprise will they?  I can't help but show you all though! I love taking pics of my projects.  I may just end up giving these goodies to the recipients BEFORE Christmas.  Shhh....

OK, on to my project.

I decided to join in on the Paper Dolls challenge this week which so happens to be Christmas in July.  They have these super cute freebie SVG files from Kadoodle Bug Designs.  Now I have seen their files before and I have never really knew what to use them for until now!  I normally use a different style of SVGs but I think this challenge has just opened up a whole new door in scrapbook/cardmaking/SVG land for me.

Lately I have been obsessed with bookmarks (*hint?*) but I don't even know why seeing that I am a new Kindle owner.  What am I going to use a bookmark for now?  I just graduated school so there goes that idea.  I have an e-reader so what's the point?  Then the other day I took my daughter to the library and BINGO!  It hit me.  My daughter could use bookmarks since I refuse to get her an e-reader.  Oh yes, this 10 year old has already asked many times for one.  Well, seeing that she is one of the few people I know that don't own an e-reader I made today's project with her in mind.  Not to say she will be getting this baby though!

Ready for pictures?  Here ya go!


Rudolph the Red Nose Penguin

Shhh, he's in disguise!

Poor guy can't reach his headband antlers to hang the ornament

Shiny red nose just like Rudolph

I used Kadoodle Bug Designs files that you can get HERE on the Paper Dolls blog.  I used the Candy Cane Stripe embossing folder from Provo Craft (I know I know...bad name but sorry...I really love my Cuddlebug and the folders!) to emboss the green behind the penguin, uh I mean reindeer.  I used my most awesome ever tool, the Crop-a-Dile, to set a green eyelet at the top of the bookmark through which I poked two colors of Trendy Twine to be used as the tassle.  As for paper, The patterned paper is from Heidi Grace Designs and is called Jolly & Bright/Gingerbread.  I picked it up at Joann's I believe.

Well, I think that about does it for this one.  Hope you enjoyed it!  Now I'm off to return my Red Box DVD before I am fined!