CLICK HERE FOR FREE BLOGGER TEMPLATES, LINK BUTTONS AND MORE! »
Showing posts with label cards. Show all posts

Monday, September 17, 2012

Etsy

I recently re-opened my Etsy shop.  It's been awhile since I was on there.  With my recent pregnancy I lost all interest in all hobbies I once loved which included crafting and reading.  Now that the little one is here I am ready to get back to everything my "normal" self loves. 

Here's a link to my Etsy shop:  19Eighty Expressions on Etsy

and

Here are some of my latest creations:


Oh how I missed crafting!!!


Monday, December 19, 2011

Christmas Joy

I have been quite the lagger lately haven't I?  I haven't been feeling well lately so I have had no urge to craft.  I did get DT project done yesterday though.  Today's post is a card you may have seen before.  I was in a Christmas card making frenzy awhile back for that craft fair I participated in and this is one of the cards I made.  Super easy card to make.


Tuesday, August 30, 2011

Another Set of Mini Note Cards

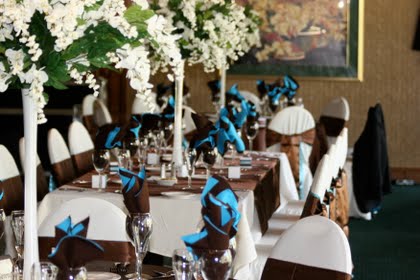
My favorite color is brown.  I know that may sound weird but for some reason it is.  My wedding even featured quite a bit of brown in it!

My love of the color brown is quite apparent here!

Wedding table set up


And here....


Me and my bridesmaids

 I am just in love with brown.  Awhile back I discovered kraft paper and ever since then all I ever want to do is make cards, projects, etc. with that darn brown paper!  Uhh, well lately I have been giving into that urge and making everything with it!  I can't stop.  Brown is so easy for me to work with.  I can match colors to brown easier than I can any other color combo.   With all this talk of brown kraft paper can you guess what the project I will post pictures of is?  The colors, paper, etc?

If you guessed brown kraft paper then you guessed right!  Woohoo!  You smarty pants, you!


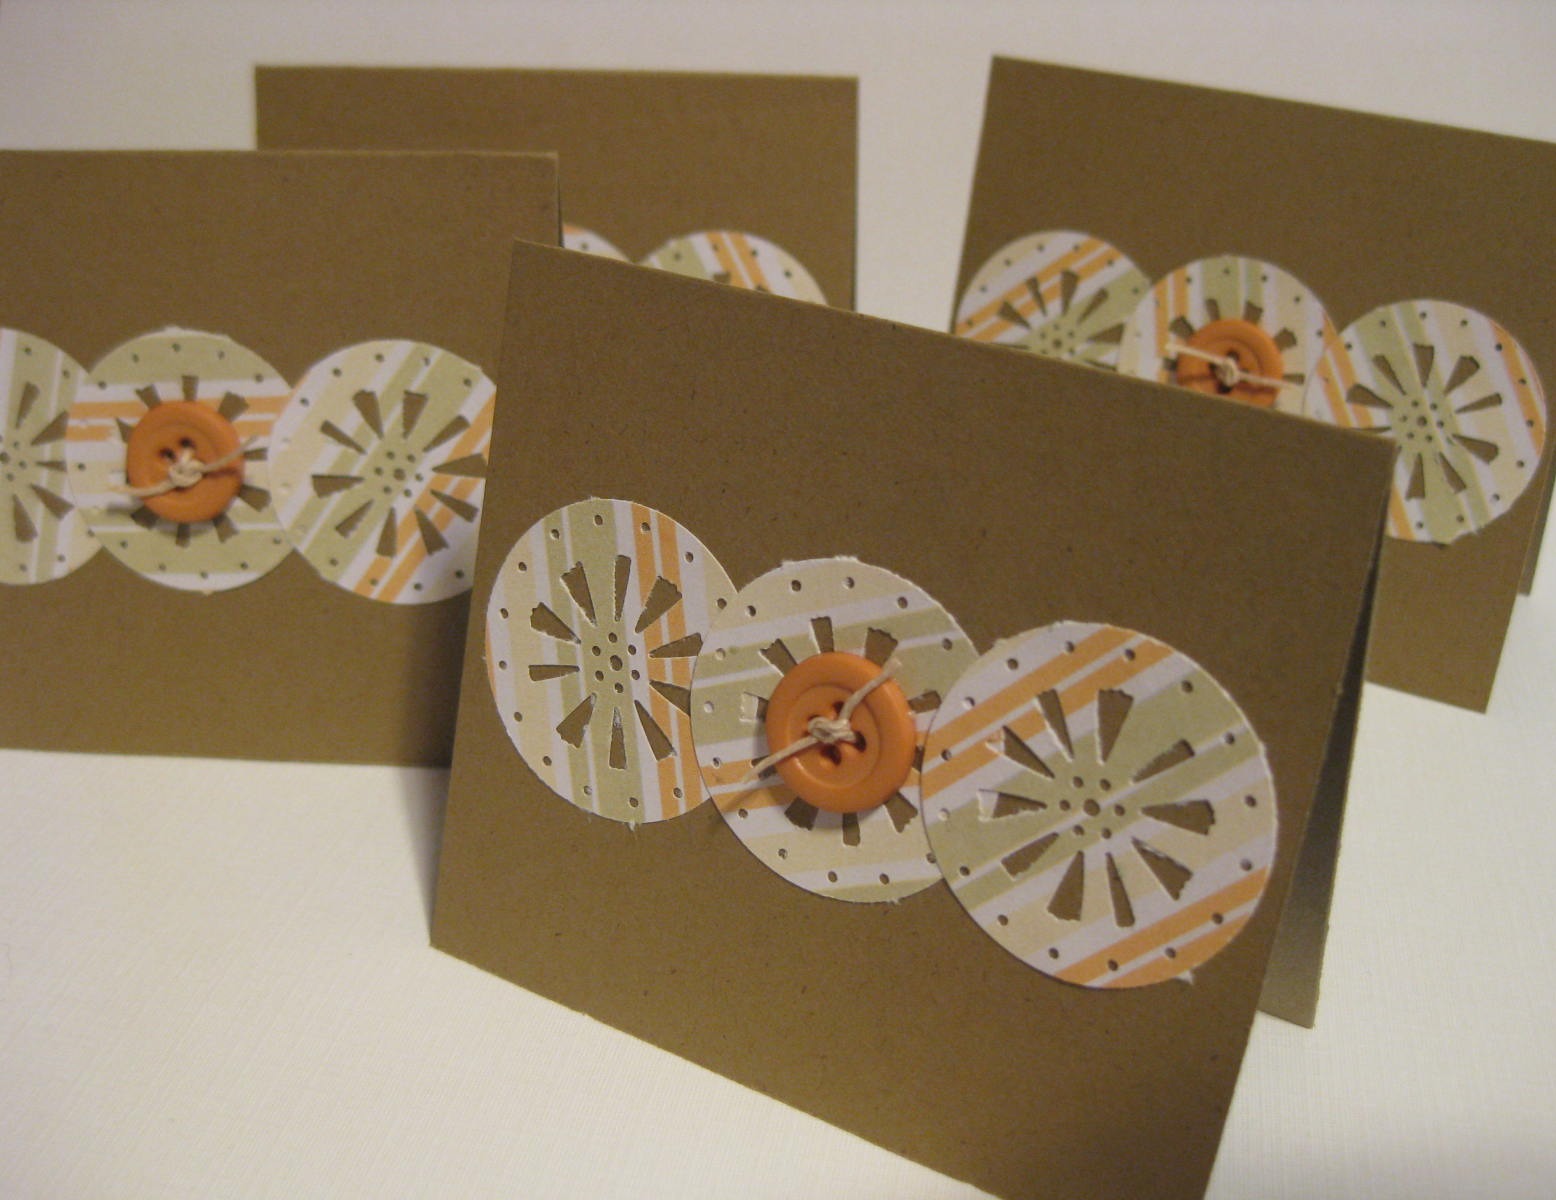
My cute and simple mini note cards!  I used a punch I had laying around that I knew would come in handy one day!  I really have no need for punches anymore...well, yea I do.  It's easier to punch out then set it all up on the Silhouette.  Don't cry Silhouette, I still love you!  Hmm, I just realized I haven't mentioned my Cricut yet...wonder why!?   *wink wink*   I set a button on the middle pinwheel and threaded some hemp through it and double tied it to make sure the sucker stayed. 

OK, so now that you know what my favorite color is and if you happen to be invited to my baby shower (if I ever decide to have another kid) remember this post so you get the answer right just in case it's on  game at the shower.  Got it?


Monday, August 29, 2011

Pendant Banner Card

I love how pendant banner cards look. They are so simple yet so pretty if done right.  I made one a few weeks ago by cutting and piecing together the pendants but this time I decided to try my had at designing my own pendant in Silhouette Studio. Ack, what was I thinking?!  I'm not a graphic designer!  I tried anyway. 

It actually wasn't too hard once I got the bowed line to look decent.  Once I got that part down I created some triangles and lined them up on the bowed line.  I removed the bowed line and welded the triangles together and and had my pendant!  I could have left the line but I decided against it and used twine instead to *hang* it.

Here's my lovely vintage-inspired card.


I used the print and cut feature in Silhouette Studio to cut the banner.  I used the Distrezz-it-All on the edges then went over it to smooth it out a little with the Tim Holtz' manual distresser.  I then lightly inked the edges, pendants, and twine to give the card an aged look.  I decided against a sentiment stamp this time around.  I like the look of it without one plus it can be used for any occasion without a sentiment. 

So what do you think of my first venture in graphic design?  Not too shabby for something so basic!

Mini Note Cards

I took a break from selling on Etsy for a few months and wasn't sure if I'd go back to it.  My sales were dismal there.  I was selling a lot outside of Etsy and not having to worry about fees but I was starting to get stressed with custom orders so I took a break from that as well.  This past week I had been considering starting up again but wasn't sure I should and then things started happening.  One person mentioned selling their handmade goods so it got me thinking.  Then another mentioned the items I make and then another person did as well all within a few days.  It pushed me to get back into it. 

I reassesed my items and came up with a new idea on what I should sell based on what I like and what I see people buy.  Simple and sweet is my new take on the items I plan on sellling.  I'm sure I'll throw in more intricate items but for now simple works.

Here is an example of a set of mini notecards that I absolutely love.  They are cute, simple, and classy.  Sometimes less is really more and I found that I wasn't following that saying before.


Mini Note Cards


Friday, August 12, 2011

A Little Tea Party Fun

It's another design team Friday for me at SVG Attic.  I enjoy my DT days!

My mother-in-law inspired today's project.  She is a pretty hardcore crafter so I know she can appreciate anything I make for her.  It's her birthday next week so I decided to make her a birthday card and feature it as today's design team project. She's the girly girl dainty type so I wracked my brain to come up with something that would fit her personality.  Something flowery and girly is what I needed.  I came up with a tri-fold shutter card with a tea party theme.

I am pretty tired of making basic cards so I have been experimenting lately with making different styles of cards.  I am having so much fun with it.  Today's project features a tri-fold shutter card.  This is the first time I've made this type of card.  I think it's my favorite type so far.  I'll bombard you with pictures before all the details!  Ready to Ooh and ahh?  Just kidding.


You like?  I really like it.  It's a fun card to make and there's so much you can do to design it.  I kept mine pretty simple.

The card measures 5 1/2' x 12"....that's the basics.  I forgot to measure all the rest of the card before I mailed it out!  So sorry!  I can make a tutorial of how to make a tri-fold shutter card if you would like.  Just let me know! 

All the SVG files I used are from SVG Attic.

I used the Vintage Patriotic Cupcake Wrappers for the star fleurette on the front of the card and placed it atop two paper flowers with a paper flower sitting on top of it.  I finished that piece of with a button and twine from Trendy Twine.   

The tea pot, stack of teacups, and the cream colored tag in the middle are all from the Mad Hatter Tea Party collection.

The bows that are on the little panels are from the Classic Wedding collection. 

Oh and guess what I finally did?  I used my Sew Easy!  I have had it about a month now!  I am so bad at buying then not using what I buy for a long time.  I just did the basic straight stitch on this card.  I used the Rustic Stack from DCWV for the paper on the base of the card and open stock paper for all the decor inside.  Oh and the last little bit is the clock.  I wanted to use the clock from the Mad Hatter tea Party collection but I was worried it would be too small so I decided to stamp the clock from a stamp set I have and hand cut it out.  

Hope you enjoyed that card!  I am definitely going to be making more tri-fold shutter cards in the future.  They are fun to make and get!

Check back in a few days for a back to school project I will be working on!


Friday, July 22, 2011

New Toy Part 1: Distrezz-it-All

I have had my eye on two tools for quite some time now.  The lovely *pink* tools are the Sew Easy and Distrezz-it-All.  I have seen them around online and at independent scrapbook stores but I have always held off for some reason until today!  I made the leap and bought both!

So far I have only used one of them, the Distrezz-it-All and let me tell you....wow!!  I have been distressing the edges of my paper by hand with Tim Holtz' distressing tool.  It works OK but I end up bending my paper and it takes a lot of time.  The Distrezz-it-All takes all those problems away.  So far I have only used it once but I love it already.  Here's a simple card I made using it.


I distressed the edges of the cardstock that the flower is on and inked the edges to give it a vintage look.  Easy easy!  I ran the paper through the machine and it was all distressed-like in no time!  If you like the distressed or vintage look the Distrezz-it-All is a must have!

Tuesday, July 5, 2011

Simple and classy

I had so much going on this weekend between holiday fun and crafting projects that I am worn out!  To appease my craft addiction last night I decided to make things simple.  I tried out something I have been wanting to do forever now, make a birthday banner card.  I really have no reason as to why I haven't done it before.  It's the easiest thing ever.  Hmm, maybe because I didn't have any twine, maybe because I am always trying to be too detailed, maybe because I am always trying new techniques.  Either way, it was time to go simple.  Sometimes I overthink projects and get things all jumbled up when really a simple classic card could work just as good or even better.


 This card took just minutes to throw together.  I played with the files in Silhouette Studio and found these lovely banner flags free.  I used twine from Trendy Twine to hang the multi-colored banners on.  Actually, they aren't hanging.  Each banner is secured to the paper using a small pop up square to give the illusion they are hanging.  I stamped the sentiment in red.  I would have rather used a stamp that had the letters much smaller and in a straight line but I didn't have any that were plain.  I was going for the plain, classic, simple is more look.  

If I had better picture-taking skills I think the image would have come out clean and crisp showing the contrast of the colorful flags against the white card.  Well, that's a project for another time!

Side note**
.....pssst, check out Trendy Twine.  I love their colors!

Friday, June 17, 2011

You Light Up My Life

I am really working on my distressing and inking techniques, as is evident in what I made today.

I made a center step card for a challenge at SVG Attic (see the forum or Jessica's Crop Corner for rules) using the lighthouse from their Cape Cod collection.  I am so extremely proud of this card!  I have been thinking about this project for a few days and how I was going to tackle it.  I couldn't wait to make it. 

Ta-daa!!!


You light up my life step card

I used ink on every edge of the paper

A brad stands in as the light

Sentiment


The step makes the front of the card pop out

Laying on it's back so you get an idea of the dimension

This was my first time ever making a step card.  I was browsing blogs this morning (while I was supposed to be at the gym) and happened upon a tutorial for this (don't worry I went to the gym after).  It looks little complicated to make but it was really easy.

I used paper from a stack I bought today at Joann's for half off.  It's the Linen Closet pack from DCWV. 

I'm so glad I bought the Tim Holtz' ink blender.  It blends and spreads the ink so well.  The blender I was using before wasn't cutting it for me.  And as you can tell, I inked the pop out of that card!

One thing I think I may need is the Zutter paper distresser.  Distrezz It All, I think is what it's called (don't quote me on that).  I am using a hand held distresser and it takes some time to make the edges just right.  I sometimes bend the paper doing it.  No bueno ("no good" in Spanish).  With the Zutter machine you stick it in an zoop it's done!  Agh, I better stop talking about toys...my husband barely OK'd the Silhouette and here I am wanting MORE! 

So I am thinking this is my favorite card I have ever made.  I can't stop looking at it.  Corny, I know!

Now it's time for you to stop by SVG Attic and join in on the fun!!

Tuesday, June 14, 2011

Challenge Entry

I decided to throw a little something together last night for the Paper Dolls third weekly challenge.  For the challenge you are required to use at least one SVG file created by Belinda of Bee's Hive O'Drama.  I used two in my entry which is a mini note card measuring 4" x 2.5".  Not sure if length or width is supposed to go first in that whole measurement thing.  I know I work with numbers all day long but I have a calculator that tells me what to do...completely different than these numbers.


Of the SVG files available (by the way go get yours...they're free...and submit a project too!)....OK, back to what I was saying before my mind wandered (as usual), of the cute SVGs that Belinda created, I used one of the hearts with the scalloped edge and the scalloped edge frame.

I crinkled the scalloped part of the heart, inked it with Tim Holtz' Dusty Concord (purple) Distress Ink then spritzed it with water to make the ink run.  I then sped up the drying process by using my heat tool.

I used a small snippet of hemp cord (teehee, that always makes me giggle) for the middle of the heart to make it appear to be a button.  The holes were in the SVG but with the lovely Cricut you won't get holes that small.  You'll just end up with some torn and wasted paper.  Now the Silhouette can probably do the job...*sigh*...I'm dreaming.

I stamped the sentiment in the same ink color as the tie-dye looking heart.

The purple base of the card was embossed with a swirly design then lightly inked in Ink It Ups! Lavender.

I think that pretty much it.  It was fairly simple to make.  Don't forget to head on over to Paper Dolls and Bee's Hive O'Drama.

Saturday, June 11, 2011

Pink lemonade anyone?

All day yesterday I shopped for a car or read a book.  Not once did I feel like being crafty.  Seriously not once all day.  Skip forward many hours to 10:45pm last night...I was bitten by the craft bug and there I was in my craft room making a card.  My eyes were tired with sleep and strain and yet I was awake coming up with what I think is one of my cutest cards to date.

The card I made last night in a sleepy haze was sort of an experimental card.  I didn't think it would turn out as good as it did but I surprised myself!  Who knew I could be creative even when exhausted.  I bought Tim Holtz' Paper Distresser the other day and some Kraft cardstock (the brown paper bag looking type) as well as an ink blender, also by Tim Holtz.  With these items I set out on an adventure to make something vintage looking.  Seeing that I have a birthday party to go to this weekend I decided to make a card for that occasion.  The theme is Pink Lemonade.   

And my work of art....

Pink lemonade

Distressed edges

Would you like some ice with that?

As I mentioned above, I used the distressing tools to create the aged look.  I used the paper distresser to scrape and curl the edges.  I then inked each edge with the blending tool using a swirling motion from my mat onto the edges of the paper.  I created the glass of lemonade myself after some research and playing around in MTC but you can get a similar glass in SVG Attic's Backyard BBQ Collection.  I used a cloudy sheer velum sheet for the glass and a light pink piece of cardstock for the lemonade inside the glass.  I inked the edges of the glass in pink and dobbed some pink onto the surface of the velum glass to add a little more color.  It turned out to go well with the distressed look the rest of the card has.  The orange, straw, and cube of ice have nothing special done to them but I cut those out as well to add a super cute touch! 

I think I did have a little bit of "I'm too tired to be crafting" last night while making this card.  The orange was supposed to be a lemon and for some reason when I picked the orange paper I thought it was yellow.  I am not colorblind...it's a consequence of being too tired to think clearly.

Enjoy!!

**Remember to follow me on Facebook!!**

Thursday, June 9, 2011

She Said Yes

Time for another day of wedding cards.  Well, let me rephrase...wedding card.  Am I obsessed with weddings again?  No.  Promise!  I met some wonderful women whom I still speak to daily during my wedding planning but I am not sure I ever want to deal with the stress of planning a wedding again. 

This particular card was made for a friend who loved the "I Do" card I made last week.  Actually this friend is one of the ladies I met a few years ago while we were both planning our weddings, which happened to be in the same month.  She has a bridal shower coming up and asked if I could make a bridal shower card.  My answer?  "Why of course!"  Me make a card?  I sure can!  It's one of the things I love to do aside from eating and reading. 

For this card I again used SVG Cuts' Kate's Silhouettes.  I love those super cute silhouettes.  I am looking for reasons to use them any time I can so of course I jumped on the opportunity when asked for a bridal shower card!  I had the perfect idea for it.  I actually made it compliment the style of the "I Do" card. 


Man proposing on one knee


"She said yes"
  There's not much to tell on the techniques I used for this card.  It actually was quite simple.  I just chose paper that I thought looked good together.  Notice a sliver of green is poking out around the edge of the card?   I love pink and green together. 

In order to add contrast I cut the woman's dress out of blue and white polka dot paper. At first I was concerned that it wouldn't match but then I realized that's exactly what I wanted! 

I used pop up squares to make the two silhouette figures 3D. 

As for the sentiment, once again I don't have a stamp that says "She said yes" so I had to print it out.  I inked the edges and it is slightly popping off the page.  I cut a pop up square in half and glued the bottom so it wasn't as high up as the silhouettes.

Maybe one day when I get the Silhouette SD I won't have to print my sentiments out.  Shhh, don't tell anyone but my husband actually gave me the go-ahead to buy it!  He actually has an ulterior motive on this decision.  Since it has print and cut abilities it can cut his pepakura.  It's a form of papercrafting as well.  He makes 3D things out of paper.  He's made a helmet and a gun so far.  It's actually really cool.  He plans to take it a step further though.  With the SIlhouette he won't have to sit and cut each piece by hand.  Ha, I didn't even realize he was a papercrafter too....even before I was!

Tuesday, June 7, 2011

It feels like summer!

Summer feels like it's here and what better way than to show you something that makes you think beach?!

I made this awesomely cute Hawaiian themed card for a friend of mine back in January.  I started out with one idea but it all changed once I started making the card.

I started out with making Hawaiian looking flowers like I made for a scrapbook page and the hula girl.  I put it all together and it just didn't look right.  The hula girl needed an environment.  She looked off just there with nothing but flowers next to her.  I scrapped the idea of flowers and decided to create a scene for her.


Hawaii anyone?


The sky is actually the base of the card.  For the ocean I dry embossed using my Cuttlebug and then inked it to give it two shades of blue rather than the one.  On top of the ocean I place a shiny tan colored cardstock that I also embossed.  I tried to ink it but the ink just slid right off.  Note to self: glossy paper = no good with ink.

Next came the palm tree or is it a coconut tree?  The palm trees here don't grow coconuts so there's my confusion!  Anyway, isn't it cute?!  I traced the image from a jpeg I found on the internet.  I embossed the tree using the Cuttlebug and a Sizzix embossing folder that I got for 60% off at Joann's.  I inked it to make the textured look give it a more real look.  The coconuts were actually scraps form another card that I had laying on the table.  Score!

I love how the coconut tree turned out

Little miss hula girl is precious.  I cut her out and pieced her together giving her skirt and hair flower double layers.  I drew in her face with pencil.  Let me tell you...that is hula girl #2.  Number 1 looked like the wicked witch of the west (that's the ugly witch right?).  I had her all ready to go and then drew in her face....umm, she looked so horrible!!  I had to take all the pieces off and redo her body/face.  Oh, and her leg foot off!  Hahaha.  The one I ended up with is perfect.  No funky face and she has two feet!

I used a hand punch for the flowers (Martha Stewart I think)


The Sentiment is stamped and embossed

A lot of work went into this card but it was fun to make and I love the end result!

Thursday, June 2, 2011

Mini note cards anyone?

Part of my crafty weekend was spent making cards and the other part was spent making tags.  Here is yet another set of items I made while I had steam.  The contest I held was actually for a set of this item.  Unfortunately no one guessed the theme correctly.  I would have taken "spring" or "garden" as an answer or even something close to that.  Maybe next time. 

I'm always on the lookout for new ideas whether it be new techniques, new tools, or new items I can make.  I have a list of what I would like to make and this was one of them.  I can now cross off mini note cards from my list.  Yay!  I wanted a theme for these cards but I didn't want to make each card exactly the same so I delved into my brain and picked an item I liked to make.  I chose the butterfly from the "Spring Butterflies" card since I really really love the look of them.  What goes with butterfly was my next thing to work on.  The theme that popped into my head was "garden" and so off I went in search of more ideas that would work with a garden theme.

Side note - I actually made the butterfly tags after I made these notecards and as you can see, they are the same colors.  I liked the colors enough to use them again. 

Spring Garden mini notes

Set of 5

The bee has googly eyes!  What's a garden without bees hovering over the flowers!?


You've seen this little lady before on my lunchbox notes set

And of course the pretty two-toned butterfly!

Here's something new!  A plant waterer?  Not sure what it's called!

Each card measures 3"x3.5".  I actually made them a decent enough size that they can fit into little envelopes.  Not a perfect fit but a good fit.  In fact these guys are so small I was able to cut quite a few of each card out of one sheet of cardstock.  Awesomeness!  I ended up making four sets!  I am struggling choosing my favorite design.  

My question to you....which is your favorite?