Well, I told you I had a big announcement and today is the day you get to find out what it is! It actually has nothing to do with paper crafting, cards, scrapbooking, etc. Sorry to disappoint if that's what you were looking forward to. I actually think it's better news than anything that has to do with paper. :)
Since it's my day to design for SVG Attic I decided to combine my announcement with my DT project. Ready for it?
Can you guess who? Hehe, it's me silly! After two long years (to the month!) we are ecstatic to announce that we are expecting child #2! This is going to be an interesting new addition. My daughter is already 10 and will just about be 11 when baby Blueberry Nugget Bean (long story) is born so there's a huge gap in age. It's actually nice though because I will have an automatic live-in nanny! Hahaha. This child is going to be annoyed by this baby before it's born if I keep teasing her!
This is my excuse for being around a lot less lately. I have been absolutely exhausted! I'm still in my first trimester and I really hope this fatigue goes away. It's zapping ALL my energy and creativity from me. My mind draws blanks when I try to think up something to make. This better go away soon or I'll have a craft room that never gets used. :( *sigh*
On to the details of the announcement card.
I used the Tent Cards from SVG Attic as the base of the card. I also used the Give a Hoot collection from SVG Attic for the 3D owl inside the tent card. I added glitter to the owl's eyelashes to bling her out! I used some pink and white Trendy Twine as a border for the frame where the owl sits behind. The front circles were actually the left overs from the cut of the card. I decided to recycle and use it as a slide window. I used my Sew Easy to stitch the floss around the outter circle to create a border. I set some snaps that I purchased on Etsy from wickedwoolgathering with my Crop-a-dile. I added a pink brad to the top so the outter window can slide up to reveal the rest of the message.
That's about it for this project and announcement! Stop by SVG Attic and browse around. You won't be disappointed! New sets are always being released!
Showing posts with label owl. Show all posts
Showing posts with label owl. Show all posts
Friday, September 23, 2011
Announcement & Design Team Project Friday
Labels:
3D,
animals,
announcement,
card,
design team,
dt,
etsy,
girl,
inspiration,
mini notecards,
notes,
owl,
papermaking,
print and cut. birthday,
Silhouette,
svg attic
Friday, July 22, 2011
New Take on a Simple Project
Well well, the day is finally here. It's my SVG Attic design team project day! Woohoo!! I look forward to these days. As I mentioned in my Christmas in July post earlier this week I am obsessed with bookmarks all of a sudden. That project was a bookmark and guess what today's project is.
Any guesses?
You guessed correctly! It's a bookmark!
Before you think to yourself, "Not another one, you just made one" let me explain. These (yes, plural) are not the normal everyday bookmarks you see. They are different than the one I made earlier this week. Anyway, I have issues with making the same thing twice. I get bored very easily so I am always on the hunt for new ideas, new techniques, new anything so these are different. They serve the same purpose but have a different design. What? You want me to shush already and see some pictures? OK, here ya go!
They look like ordinary bookmarks don't they? So can you figure out what's different about these? Betcha can't......not yet at least. Here's some *action* shots!
How cool is that? They are so easy to make too! Here's a picture of the first one I made. A very simple one for my daughter which really only took a few minutes to whip together.
I used a piece of cardstock, a piece of patterened paper, and some eyelets. Telling ya, super easy!
On to the nitty gritty of how I made these little guys!
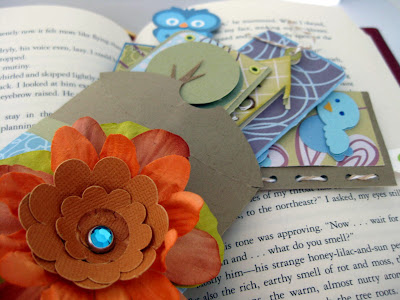
As mentioned above, I used a piece of cardstock and a piece of patterened paper as the base for each bookmark. From there I used my little creative brain to make each one different. Each bookmark is 2" in width and 3.25" in height when folded and 4" x 6.5" unfolded. The cardstock is folded in half like a card but you open it on the opposite side. You can make the bookmark open up the other way as well. The left side and top of each is secured so that only a small slit is created into which you can slide the book page into. I decided to secure each differently so you can get some ideas. I'll detail each one individually.
1. Tweet Tweet
I used the Birds and Bees Collection from SVG Attic which you can get HERE. I sized the birdies down in MTC to fit the bookmark and they are about 1.5" by 1" each. The sentiment stamp comes from the coordinating stamp set from My Thoughts Exactly called Birds and the Bees which you can get HERE. The patterned paper is ColorBok which I bought from the Target dollar bin. In fact all the paper is from the same pack. Oh, and guess what I found out! ColorBok has a warehouse not too far from me where they have clearance sales from time to time! Yay me! The twine I used to secure the left side is called Krazy for Kraft from Trendy Twine which you can purchase HERE. I punched holes in the side and threaded the twine through. The looped ribbon at the top is looped and is from American Crafts.
Any guesses?
You guessed correctly! It's a bookmark!
Before you think to yourself, "Not another one, you just made one" let me explain. These (yes, plural) are not the normal everyday bookmarks you see. They are different than the one I made earlier this week. Anyway, I have issues with making the same thing twice. I get bored very easily so I am always on the hunt for new ideas, new techniques, new anything so these are different. They serve the same purpose but have a different design. What? You want me to shush already and see some pictures? OK, here ya go!
 | |||
| Set of four bookmarks |
 | ||
| Pillow box |
 | |
| There's something a little different about these bookmarks |
 | |
 |
| Tweet Tweet |
 |
| Who Who |
They look like ordinary bookmarks don't they? So can you figure out what's different about these? Betcha can't......not yet at least. Here's some *action* shots!
 |
| Corner bookmarks |
 |
| The paper slips through an opening on the right. |
 |
| Slip the book page right in there |
I used a piece of cardstock, a piece of patterened paper, and some eyelets. Telling ya, super easy!
On to the nitty gritty of how I made these little guys!
As mentioned above, I used a piece of cardstock and a piece of patterened paper as the base for each bookmark. From there I used my little creative brain to make each one different. Each bookmark is 2" in width and 3.25" in height when folded and 4" x 6.5" unfolded. The cardstock is folded in half like a card but you open it on the opposite side. You can make the bookmark open up the other way as well. The left side and top of each is secured so that only a small slit is created into which you can slide the book page into. I decided to secure each differently so you can get some ideas. I'll detail each one individually.
1. Tweet Tweet
I used the Birds and Bees Collection from SVG Attic which you can get HERE. I sized the birdies down in MTC to fit the bookmark and they are about 1.5" by 1" each. The sentiment stamp comes from the coordinating stamp set from My Thoughts Exactly called Birds and the Bees which you can get HERE. The patterned paper is ColorBok which I bought from the Target dollar bin. In fact all the paper is from the same pack. Oh, and guess what I found out! ColorBok has a warehouse not too far from me where they have clearance sales from time to time! Yay me! The twine I used to secure the left side is called Krazy for Kraft from Trendy Twine which you can purchase HERE. I punched holes in the side and threaded the twine through. The looped ribbon at the top is looped and is from American Crafts.
2. Pretty Tree
The tree is from Give a Hoot SVG Collection from SVG Attic and is sized to just under 1.75" x 3". The sentiment stamp is from the My Thoughts Exactly Birds and the Bees stamp set. I secured the left side of the bookmark with eyelets that I set using a Crop-a-Dile. I criss-crossed some brown bakers twine from Trendy Twine around the trunk of the tree.
3. Hoot Hoot
The owl is from SVG Attic's Give a Hoot Collection. I welded him to the top of the bookmark in MTC. To make sure he's stable it's best to weld him at equal intervals on the full length of the bookmark (unfolded) in MTC and then fold together when cut. If you don't you have a poor owl that is falling off his perch! He's 1.25" x 1/5". The sentiment stamp comes from My Thoughts Exactly Birds and the Bees stamp set. I sewed the left edge and top together using a sewing machine.
4. Birdie House
The birdhouse comes from the Birds and Bees Collection at SVG Attic and is 1.5" x 2". I looped the brown twine around where the bird house entrance holes are and looped some of the lighter brown twine at the top. The twine is from Trendy Twine. Hmm, are you seeing a *trend* with the twine? Yes, I LOVE their twine! To secure the side and top I glued the bookmark edges.
That about does it...sort of. Just one more element to talk about. The pillow box!
To fit the bookmarks in the pillow box I had to size the box in Silhouette Studio to just about 7.5" x 7.5". I folded up the pillow box along the scored lines and went on my merry way decorating it. I used the flower from the Mad Tea Party Kit SVG Collection from SVG Attic. I centered it on three different paper flowers and topped it off with a blue jewel brad. I used a strip of cardstock and a strip of patterned paper around the pillow box and wrapped some green twine from Trendy Twine around it as the finishing touch.
OK, really that is it! Whew, that was long! Now to figure out who to give this to!
Labels:
birdhouse,
bookmark,
gift,
mte,
my thoughts exactly,
nature,
owl,
pillow box,
present,
svg attic,
tree,
trendy twine
Subscribe to:
Posts (Atom)


