CLICK HERE FOR FREE BLOGGER TEMPLATES, LINK BUTTONS AND MORE! »
Showing posts with label design team. Show all posts

Thursday, November 24, 2011

Snowman Frame


I hope you all had a great Thanksgiving (for those of you who celebrated).  My day was full of family, food, and fun.  I tried my hand at some 10pm Black "Friday" shopping (on a Thursday!) and turned my happy butt right back around and drove home when I saw the people lose their minds in Walmart over some video games.  It was nuts.  I used to be a seasoned Black Friday shopper but I just can't handle it anymore.  Anyway, for those of you who braved the madness, I hope you got what you wanted!

Today is my SVG Attic design team project day.  Yippee.  I made a bit of home decor since I have absolutely none for Christmas.  Sure I have a tree and ornaments but...well...that's about it.  I decided it was time to make something festive to display in my barren house.  


I got the very pretty white frame from the dollar store (score!) for a whopping $1 (duh).  Not too shabby eh?  It's about 7"x7" in length and width.  

The background paper came from DCWV's Christmas & Winter Stack. 

The snowman is from SVG Attic's Build a Snowman collection.  Isn't he adorable  I stamped Mr. Snowman's eyes on using Peachy Keen's Simple Sallies ou Face Assortment

I had cut the "BELIEVE" that's at the top of the frame for another project I did this past weekend and I saved all the cutout letters.  Good thing I did because it goes perfectly with this framed snowman.  

The snowflakes are confetti-like pieces I've had since last Christmas.  I knew those babies would come n handy again one day!

I hope you enjoyed this project.  Look for my next project very very soon!  I made a gift for my mother-in-law which I think you'll love.  I seriously did NOT want to give it away.  

Also, remember to enter for your chance to win a free My Memories Scrapbooking Software Suite!  Click HERE for details.   

Enjoy the rest of your weekend!

~Kasi

Saturday, November 12, 2011

Exciting News!


I have some exciting news.  Last night I was asked to join the Trendy Twine design team!  It totally took me by surprise.  I really love their twine and use it quite often on my projects.  There's a blog you can follow  to get some twine-tastic inspiration and a Facebook page as well.  I will be working with some amazing and talented ladies.  I am so excited about it.  The owner, Lesley is pretty amazing.  She's really a sweetie.

Here's some of the projects I've done in the past using Trendy Twine:


Friday, November 11, 2011

Fall Pillow Box

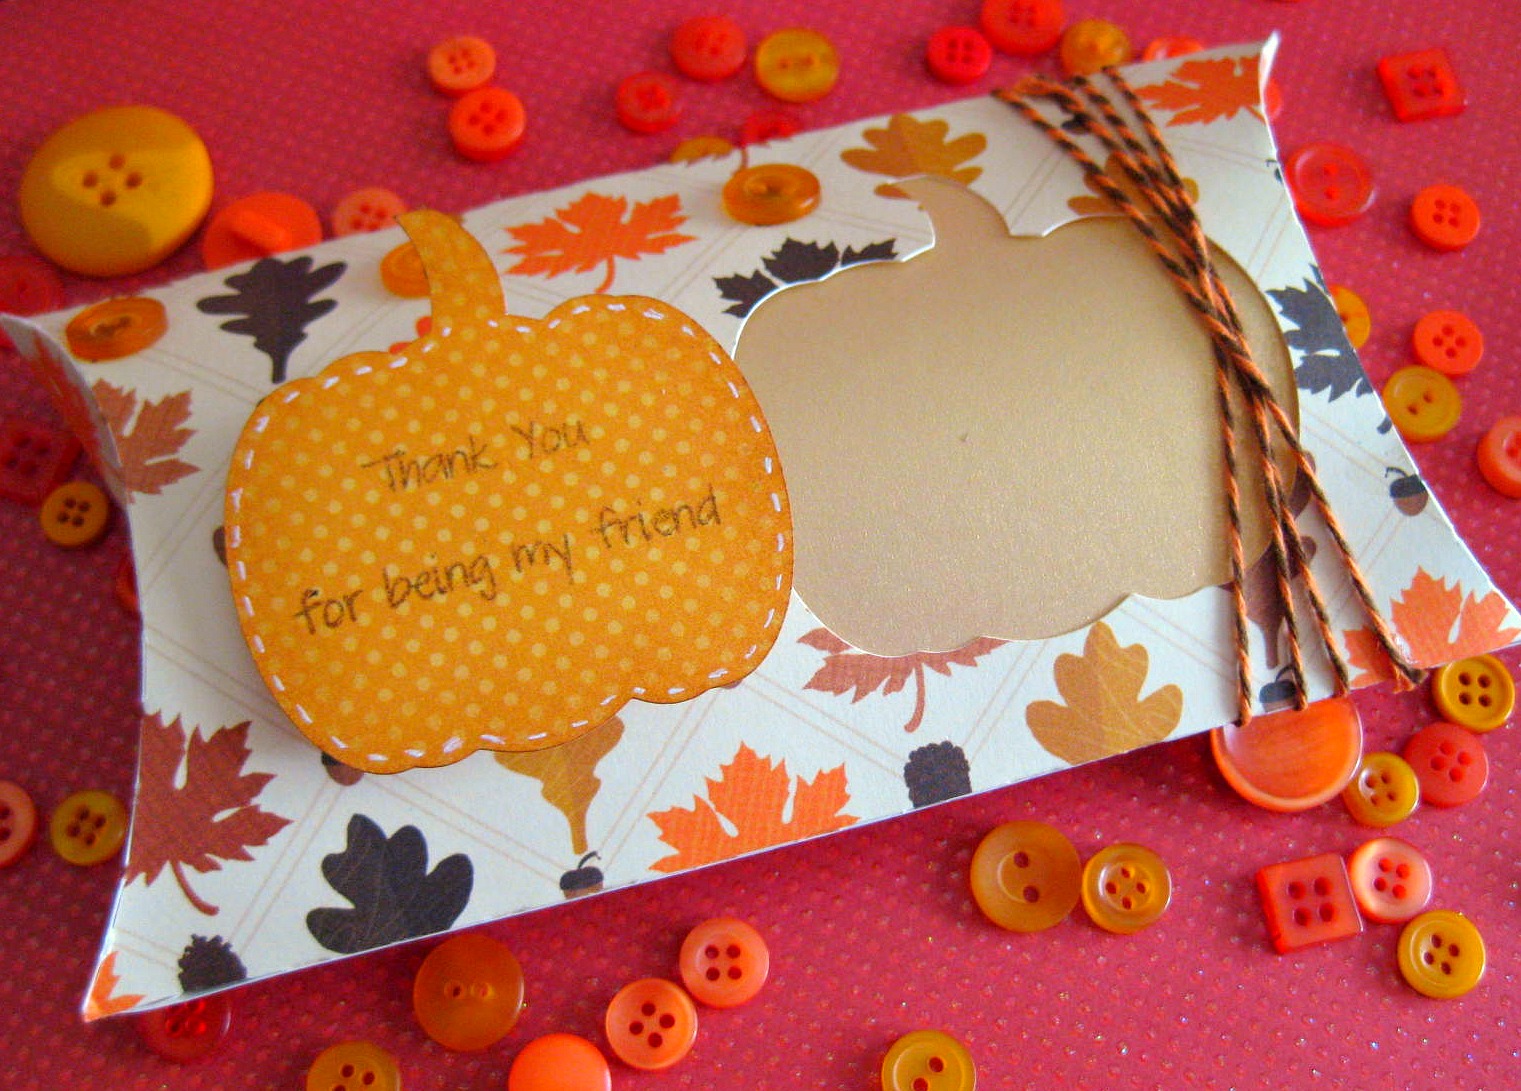
One thing I am grateful for are the amazing friends I have.  I truly have surrounded myself with awesome people, all of whom I've known for many years and go as far back as junior high.  Each friendship began at different times in my life and while I've been at different stages in growing as a person.  Each friendship has held strong and I am so thankful for the support they give me in my times of need.  I made my latest SVG Attic design team project with this in mind and of course because of the time of year.


For this pillow box I used SVG Attic's Holiday Cheer Gift Boxes SVG collection which has some really really cute gift boxes.  In it you get the pillow box I used, Santa's sleigh, an ornament bag, and a gift card holder.  Perfect for the holidays.  

I also used the Pumpkin Patch SVG collection from SVG Attic to make the cutout of the pumpkin and the pumpkin die cut.  The cutout is backed with gold vellum.  I used a white gel pen to add "stitching" to the pumpkin die cut.

The right side is adorned with some Orange Truffle twine from Trendy Twine.  You can also find them on Etsy HERE.  Please note that the shop is closed until November 28th (vacation).

The sentiment is from My Thoughts Exactly's Many Thanks stamp set.  MTE stamps are for sure my favorite sentiment stamps around.  The quality is better than other stamps I have tried and they don't get discolored!  Also, the sentiment stamps super sharp and clearly. 

I added some orange buttons I bought for $2 at the Scrapbook Expo last weekend.  The store is called Scrapbuck.  They have some pretty good deals and free shipping right now with a $20 purchase.

The paper is from DCWV's Harvest Gathering Stack.  Did you hear they are opening a DCWV Deals website?  Look for that in the near future.  I am super excited to stock up on paper stacks that they don't sell around here anymore.

Enjoy your weekend and have a great Veteran's Day.  Remember to thank a veteran!

Friday, October 21, 2011

SVG Attic DT Project: Fall Harvest

Hello and TGIF everyone!  I am so happy today is Friday and my day off.  I got to sleep in a little which was very much needed but I had to drag myself out of bed much earlier than I wanted to get this post going.  I am behind schedule on this!

For all my new followers, I wanted to thank you for stopping by and to my "oldies" thanks for coming back!  Just a quick little note, I am on the SVG Attic design team.  I work with a bunch of great ladies on the team.  There's a few new DT projects a week so make sure you check SVG Attic's blog for all the latest.  I post my projects the 2nd and 4th Fridays of the month.

Let me get on to the stuff you came here to see!  My project!  In my last post I mentioned I was scared of layout.  I started off making layouts way back when I got into scrapbooking (haha, only a year ago!) but since then I found I loved making cards.  I got so used to making cards that making a 12x12 layout seemed like way too much for me.  How the heck do you fill a 12x12 page?  Somehow I figured it out and now I am loving layouts again...as long as they are one page layouts!  I haven't graduated to two pages layouts yet.  With all that said, I bet you can guess what my project is!


I love how this layout turned out.

I used the Fall Leaves SVG collection as my inspiration and starting point for this project.  I mix and matched the colors and used Tim Holtz Tea Dye distressing ink to make them look a little dirty and not so bright.

I used the super cute Apple Picking collection for my barrel of apples and of course the apples themselves.  I embossed the inside piece of the barrel with the Cuttlebug Distressed Stripes embossing folder.  I then used Tim Holtz Tea Dye distressing ink to give it some additional depth.

I also used the same embossing folder for the yellow frame around the picture.  For that part for the layout I used my Zutter Distress-it-all to distress the edges and again used the Tea Dye ink to make it look older and ragged.  I add red eyelets to the top using a Crop-a-Dile.   

The patterned paper is DCWV's Harvest Gathering stack.

On the left side I framed in the boarder with Trendy Twine's brown and orange fall twine.  Its kind of hard to see but it's there.  

I created the title in Make the Cut.  I love how you can use any font on your computer.  In fact I cut all the SVGs using MTC. 

The finishing touches on the layout are the three cute little brown buttons on the right side.  I tied off some hemp on the buttons to add more color. 

I hope you enjoyed this project and hope you come again!

Friday, September 30, 2011

Halloween Coasters - Spook-tacular Blog Hop

Thank you so much for joining SVG Attic on their very first blog hop!  I hope you enjoy all of the spook-tacular projects that you will see which just happen to be made by some of the most awesome and talented ladies I know.  

So are you ready for more hopping?  Well, you've made it to the right place if you came from Ruthie's blog.   If you are just starting the blog hop then hop on back to the beginning which is HERE at the SVG Attic blog.

Now on to my project!

For the hop I made decoupage ceramic tile coasters, each with a spookily cute character from the Spooky Friends collection.


For instructions on how to make decoupage tile coasters visit my post HERE.  I did everything the same as in that post except added some additional spookily cute designs to my tiles.  You like?  Oh and yes, these tiles are waterproofed and full functional.  A perfect addition to you Halloween decor!


I know when it comes to hops you all like prizes.  Who doesn't right?  Well, this hop is no different.  For participating in this hop you have a chance to win a $10 gift certificate to SVG Attic.  My only requirements are:

1.  Become a follower 
2.  Comment on this post. 


That's all.  Super easy.  You have until end of day Sunday October 2nd to leave your comment. The winner will be revealed Monday and will be chosen at random.  Since it's so easy you have no excuse NOT to comment right?  :)

Oh AND there's also a grand prize, a $30 gift certificate from SVG Attic, so make sure you visit all the blogs and comment on the projects for your chance to win!


Next up on the agenda, for the duration of the hop (September 30 - October 2), use coupon code "SVGHOP" to save 30% off your total purchase.  Also don't forget to join in on the SVG Attic contest going on now.  Get the info HERE.
Here is the blog line-up.
Jessica B. 
Ruthie 
(me)------>Kasi  <----- (me)
Anna Dawn
  Jessica L.
Raven
Cristina
 Your next stop on the hop is the awesomely talented 
Anna Dawn
Thank you so much for joining us on the hop!


Thursday, September 29, 2011

MTE: Guest Designer

Fall is here...well, not in CA exactly.  It's still hot but I'll just pretend we have east coast weather and changing leaves while I post this.  With fall comes the start of the holiday season.  Can you believe it!?  Since fall seems to be on everyone's minds lately I made a card that is quite fitting.  To tell you the truth I'm not exactly ready for summer to be over but oh well, guess no more beach cards for a few months.  Darn!

Awhile back I was invited to be a guest designer for My Thoughts Exactly which is an up and coming stamp company.  I have designed for them once so far back in July.  I made an ice cream cone waterfall card that you can see here.  For today's project I made a card as well.


I used the Sweet Thoughts stamp set from My Thoughts Exactly for the "give thanks" sentiment.  The best thing about these stamps is that you can mix and match words and phrases.  It gives you so many options!  You can even mix and match between the sets.  They stamp so clearly and sharp and clean up so easily.  I highly recommend trying a set out.  I think you'll fall in love!

The paper comes from DCWV's Ghost's and Goblins Stack and the Harvest Gathering Stack.  I used kraft paper for the base.    

I used two different twine colors from Trendy Twine, dark blue with light blue and white and also the Thanksgiving Bakers Twine, as a border or frame.  The colors came together quite well.

I finished of the card with two cute little buttons adorned with some hemp twine.

I hope you enjoyed this card.  Come back tomorrow for the SVG Attic Spook-tacular Blog Hop where you will get to see some great Halloween projects!


Friday, September 23, 2011

Announcement & Design Team Project Friday

Well, I told you I had a big announcement and today is the day you get to find out what it is! It actually has nothing to do with paper crafting, cards, scrapbooking, etc. Sorry to disappoint if that's what you were looking forward to. I actually think it's better news than anything that has to do with paper. :)

Since it's my day to design for SVG Attic I decided to combine my announcement with my DT project. Ready for it?


Can you guess who? Hehe, it's me silly! After two long years (to the month!) we are ecstatic to announce that we are expecting child #2! This is going to be an interesting new addition. My daughter is already 10 and will just about be 11 when baby Blueberry Nugget Bean (long story) is born so there's a huge gap in age. It's actually nice though because I will have an automatic live-in nanny! Hahaha. This child is going to be annoyed by this baby before it's born if I keep teasing her!

This is my excuse for being around a lot less lately.  I have been absolutely exhausted!  I'm still in my first trimester and I really hope this fatigue goes away.  It's zapping ALL my energy and creativity from me.  My mind draws blanks when I try to think up something to make.  This better go away soon or I'll have a craft room that never gets used.  :(  *sigh*

On to the details of the announcement card.

I used the Tent Cards from SVG Attic as the base of the card. I also used the Give a Hoot collection from SVG Attic for the 3D owl inside the tent card. I added glitter to the owl's eyelashes to bling her out! I used some pink and white Trendy Twine as a border for the frame where the owl sits behind. The front circles were actually the left overs from the cut of the card. I decided to recycle and use it as a slide window. I used my Sew Easy to stitch the floss around the outter circle to create a border. I set some snaps that I purchased on Etsy from wickedwoolgathering with my Crop-a-dile. I added a pink brad to the top so the outter window can slide up to reveal the rest of the message.

That's about it for this project and announcement! Stop by SVG Attic and browse around. You won't be disappointed! New sets are always being released!

Friday, September 9, 2011

Pumpkin Patch Mini Notes

Welcome to another Friday! Today I have a cute little project for you but first a few things. If you look to your left you will notice that I have made blog button. You can grab it and add it to your blog if you want. To the right I added a blinkie. It's for the Spook-tacular SVG Blog Hop that I, and a lot of talented ladies, will be apart of. It's going on September 30th through October 2nd. Make sure to mark your calendar and hop along with us! On to my project. I'm still obsessed with kraft paper. I know, I know....still!? I can't help it. I keeps calling my name every time I sit at my craft table. I used one of SVG Attics' new sets, Pumpkin Patch SVG Collection, to make some mini note cards that are perfect for fall. Take a look at the adorable collection!


And here are the mini note cards I made using that awesomely cute collection.


The mini note cards are pretty small and measure 2.75" x 3.5". I used one of each of the pumpkins from the Pumpkin Patch SVG Collection so each mini note was slightly different. I shaded each piece of the pumpkin with Tim Holtz' distress inks to give each little guy some depth. I also used sandpaper to add a little more depth and additional color. I was contemplating adding twine but I decided against it. I kind of like these little cards naked! I hope you enjoyed today's project! Remember to mark your calendar for the blog hop and to grab my blog button! Also, check out SVG Attic for more awesome SVG collections. There is ALWAYS a new set being released so you definitely won't be disappointed!

Friday, August 26, 2011

Trick or Treat!

And here we are again.  Welcome back and thank you for coming to visit!  I hope you enjoy your stay.  Aside from my project I have a few other tid bits (is that one word?) to share with you.

First order of business, SVG Attic is holding a design team call.  Yea, Jessica got tired of us oldies and is looking for fresh new faces.  I am just kidding.  She loves us but she really is looking to expand her design team so that part wasn't a joke.  I know you all want to work with super cool Kasi (me).  Come on, you know you do!!  On a serious note though, go apply.  We are super cool and the most awesome design team ever (that's not a joke either)!  Promise!  Plus, you get free SVGs and get to participate in blog hops.  My only requirement for you is that you have a sense of humor.  Did that convince you yet?  Do you meet my requirement (that's not a real requirement)?  If so, head on over HERE!

Second, SVG Attic has been releasing mini SVG sets each time they reach increments of 100 on their Facebook fan page.  Head over there and "Like" them now if you haven't already and get in on a chance to get some cute free SVGs.

OK, now on to what you have been waiting for, my project!  Some background on it...the boss-lady (Jessica) said, "No more cards, think outside the box!"  So I did that...literally.  Hehe.  Really though she is totally fine with me making cards.  I stick to cards because I can always give them away to almost anyone.  With 3D projects I can never figure out who to make them for.  I know, a gift box or something but really I don't usually give out things like that.  Guess it's time to start, huh?  Well, thanks to Jessica I have actually come to enjoy making 3D paper things.  Today's project is my very first SVG box and first Halloween project of the year!  I know...already, right?!     


Front

Back

Wooden door (embossed)


Trick or Treat!!
I'm proud of my first box err, milk carton.

This spook-tacular milk carton gift box measures 5 1/2" tall.  In MTC I sized it so the carton stayed proportionate.  I used SVG Attic's Raven Claw Manor  SVG kit for both the haunted house and the tag.  The house is actually a box in the set but I played with it and just used parts of it so I could attach it to the milk carton from the Fun Favors SVG Collection.

I embossed both the roof and the door.  Didn't those two pieces come out super cool?  I really love embossing things.  It adds so much more umph to projects.

The tag was actually a card in the Raven Claw Manor collection but I decided to make it into a tag for this project.  I used a stamp I bought in the dollar bin last year from either Michael's or Joann's.  The "or" got wet so the ink kinda splatted and I had to write it in...oops!

I used my Crop-a-dile to set the eyelets on the top of the milk carton and I tied it with some spooky orange and black twine from Trendy Twine.  Word on the virtual street known as Facebook is that they are coming out with two new colors of twine!  Keep on the lookout for those.

Last bit of news.  There's going to be a few blog hops I'll be participating in within the next few months.  I've never been in one so I'm stoked!  Woohoo!  See, yet another reason to try out for the SVG Attic design team!